- Published on
Save Money With a Self-Hosted WireGuard VPN in AWS
- Authors

- Name
- Michael McCarthy
In my previous blog post, I walked through how to set up a NAT instance as a cheaper alternative to a NAT gateway. This solution enabled the instances in your private subnets to access resources on the internet, with a cost savings of over 90%! Well, I'm here today to tell you that that's only half the battle; a NAT solution will enable traffic out of your private subnets, but you need a VPN solution to enable traffic in. And I'm happy to say that I have another self-hosted solution that will save you over 97% compared to the AWS managed offerings!
The AWS managed solution to connect to your AWS resources through VPN is the AWS Client VPN, which offers high availability and elasticity, multiple authentication options, and deep integrations with existing AWS service all in a fully-managed package; unfortunately, these features come with a price tag of $0.10 associated subnet per hour plus $0.05 per connection per hour, which is $0.15 per hour minimum.
Managed services like AWS Client VPN make sense when working for a larger company on production-level use cases where any downtime could lead directly to loss of revenue. However, personally, cost savings mean much more to me, which is why I decided to self-host WireGuard, an open-source VPN, for only $0.0042 per hour, a 97% savings!
Prerequisites
Just a few simple requirements before starting:
- Console access to an AWS account with permissions to create EC2 resources like instances, key pairs, and security groups and VPC resources like route tables
- An existing VPC in said AWS account with at least one public and one private subnet
- A local environment with permissions to install and run a WireGuard interface
Solution Overview
This is a simple manual setup of WireGuard VPN running in an on demand t4g.nano EC2 instance. We'll launch the EC2 in a public subnet and access the instance directly with SSH. From within the instance we'll download and configure the WireGuard interface as a VPN server, creating keys, etc. And manually download and configure a second WireGuard interface locally acting as a VPN client. When we're done, we should be able to directly access resources in our private subnets through their private IPs over the WireGuard VPN.
Step 1: Create WireGuard Server Instance
To start things off, we'll deploy a new EC2 instance into one of our public subnets. It doesn't matter what subnet you choose as long as your selected subnet shares a VPC with the private subnets you're hoping to reach.
Create your new instance at EC2 > Instances > Launch an instance.
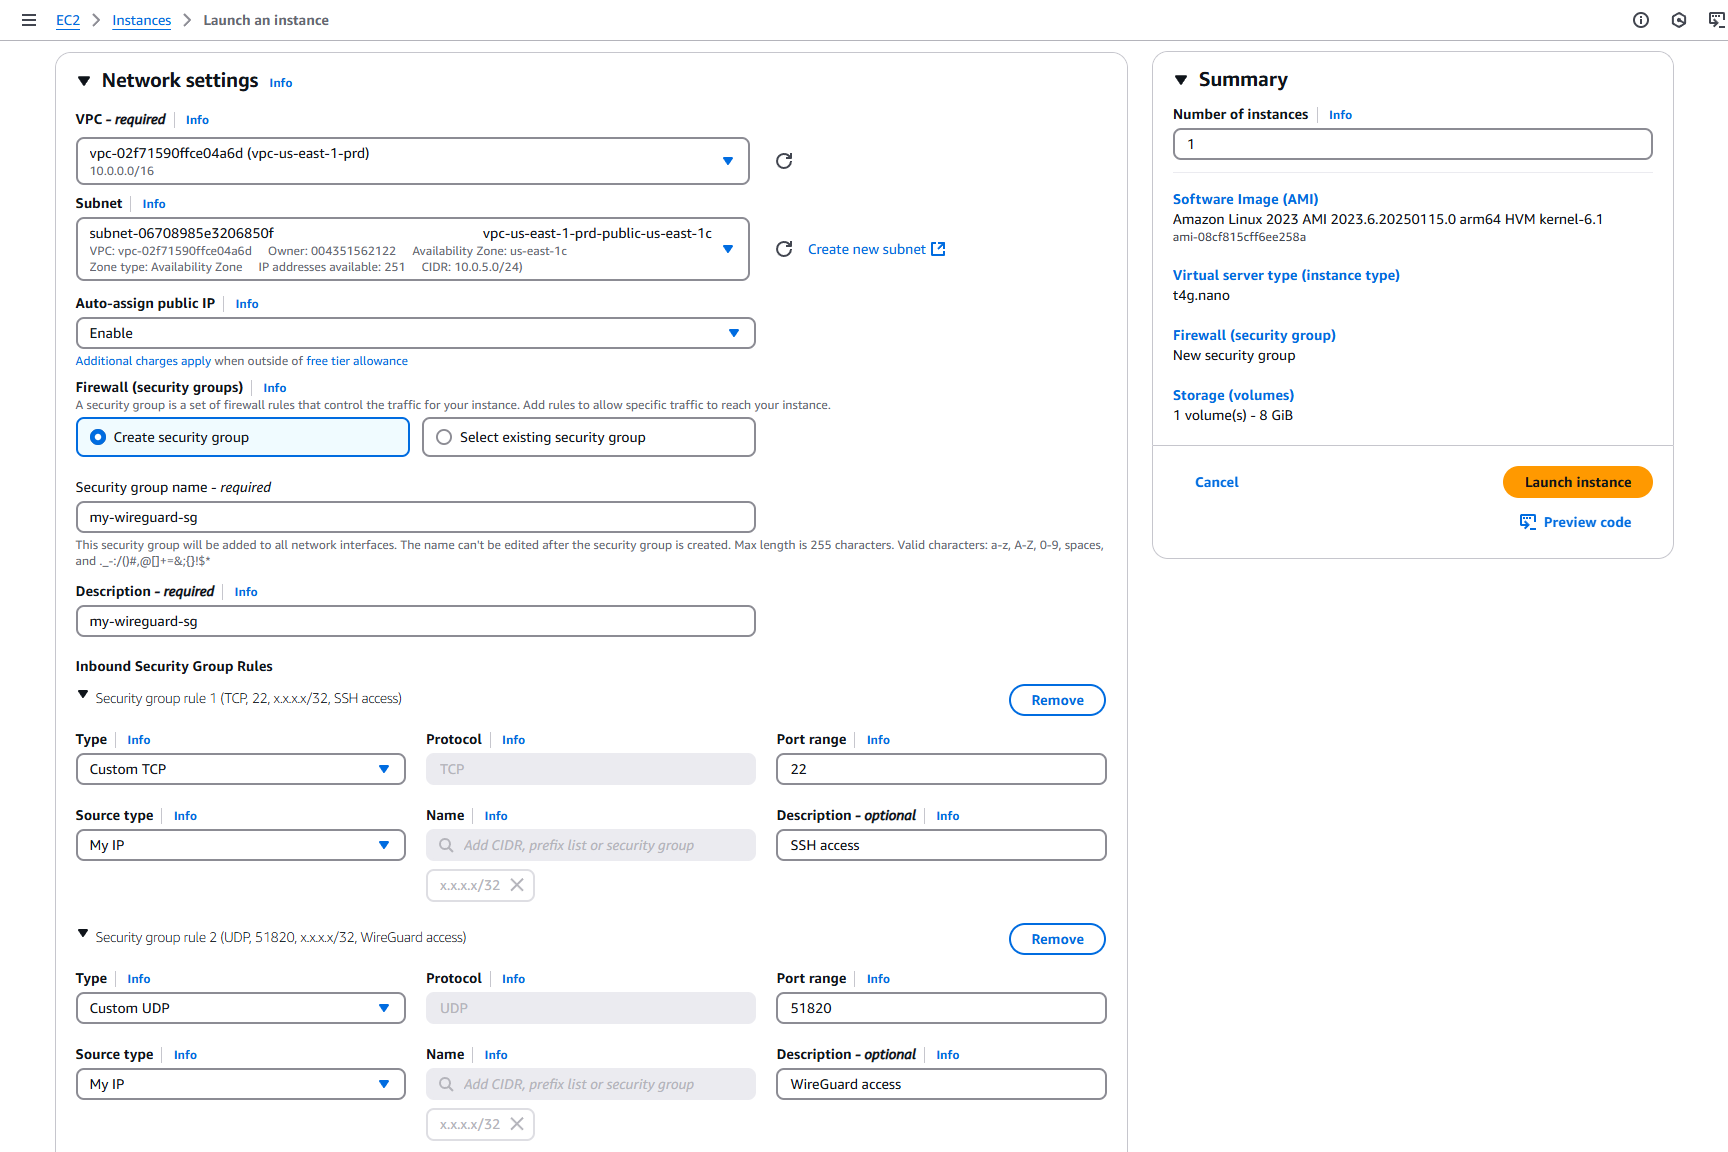
Above you can see a summary of how I configured my instance, here's what's important:
- Amazon Machine Image (AMI): Selecting Amazon Linux 2023 AMI is required for later shell commands
- Architecture: 64-bit (Arm) allows us to use Graviton instances, 10 - 20% cheaper vs. non-Graviton instances
- Instance type: t4g.nano is currently AWS's cheapest instance type at $0.0042 per hour on demand
- Key pair name: Select an existing key pair of create a new one (it's important you have your private keys)
- Subnet: Select a public subnet in the VPC where you want to connect to private subnets through VPN
- Inbound Security Group Rules: You'll want at least two specific rules here, one allowing TCP access on port 22 for SSH, and another allowing UDP access on port 51820 for WireGuard (you'll see where this port is configured later). I specify access only from my IP, but feel free to customize the source as needed
Click Launch instance to finish creation of the instance.
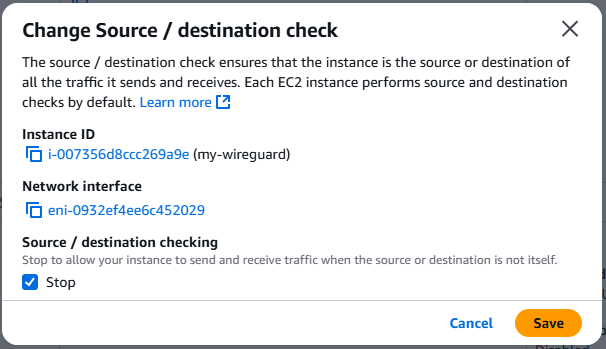
There's one more change we need to make before this instance can host a WireGuard server, stopping the source / destination check. Just like the NAT instance created in the previous post, the WireGuard server will not be the source or destination of the traffic it sends and receives by its very nature. We need to disable this check so that the WireGuard server is able to forward traffic successfully. From the instance details page, go to Actions > Networking > Change source/destination check and select Stop.
Step 2: Update Private Subnet Route Table(s)
As previously said, we needed to stop the source / destination checking for our AWS instance, and that's because the traffic routed through our WireGuard server to our private instances won't appear to come from the instance itself, it will appear to come from the WireGuard internal IP of the client! As we see later, this will be set to 192.168.2.2.
While in AWS, the route tables determine where network traffic from a subnet is directed, and by default, our route tables won't know where to send traffic from 192.168.2.0/24. If you followed along with the previous NAT instance blog post, you'll likely have a rule for 0.0.0.0/0 directed to our NAT instance; traffic will likely be redirected here and fail to make it back to our WireGuard client! So now we'll add a new route directing WireGuard traffic back to our WireGuard server instance!
Create a new route by going to VPC > Route tables > <route table ID> > Edit routes. Below I add a new route with Destination 192.168.2.0/24 (WireGuard internal subnet) and a Target as the instance ID of the WireGuard server instance. This step should be repeated for each route table of each private subnet you want to access from the VPN.

Step 3: Download and Configure WireGuard Server
This next step requires running commands on the newly launched instance itself. I'll be connecting with SSH using the key pair name specified when creating the instance, but feel free to connect with Session Manager or any other solution you'd like!
Once you're inside the instance, the first thing to do is to update the system and install the necessary packages, wireguard-tools and iptables.
# Update system and install necessary packages
sudo dnf update -y
sudo dnf install -y wireguard-tools iptables
Next, as a requirement of WireGuard, each interface needs public and private base64-encoded keys to encrypt network traffic. Here, this means that we'll need one set of keys for the WireGuard server, and one for the WireGuard client. We can generate these with two separate one-liners.
# Create public/private keys for server and client
wg genkey | tee server-privatekey | wg pubkey > server-publickey
wg genkey | tee client-privatekey | wg pubkey > client-publickey
It goes without saying, that these keys should be kept private, and take steps to avoid accidentally exposing these by checking them into a repo, etc. We do have some security redundancies built into what we've already set up, for example, restricting access to the WireGuard server to only our own IP, however, publicly exposing these keys is an unnecessary risk.
Now I'll create the actual WireGuard configuration at /etc/wireguard/wg0.conf.
[Interface]
PrivateKey = xxxxxxxxxxxxxxxxxxxxxxxxxxxxxxxxxxxxxxxxxxx=
Address = 192.168.2.1/24
ListenPort = 51820

PostUp = iptables -A FORWARD -i wg0 -j ACCEPT; iptables -A FORWARD -o wg0 -j ACCEPT; iptables -t nat -A POSTROUTING -o eth0 -j MASQUERADE
PostDown = iptables -D FORWARD -i wg0 -j ACCEPT; iptables -D FORWARD -o wg0 -j ACCEPT; iptables -t nat -D POSTROUTING -o eth0 -j MASQUERADE

[Peer]
PublicKey = xxxxxxxxxxxxxxxxxxxxxxxxxxxxxxxxxxxxxxxxxxx=
AllowedIPs = 192.168.2.2/32
Here's a quick breakdown on the above:
- PrivateKey: Value within the previously created file
server-privatekey - Address: Wireguard internal IP address (and subnet we added a new route for) for the server
- ListenPort: UDP port that WireGuard will listen on (this is the port we whitelisted in our instance's security group inbound rules)
- PostUp/PostDown: Shell commands run when the WireGuard interface goes up or down (creating the iptable rules of the VPN)
- PublicKey: Value within the previously created file
client-publickey - AllowedIPs: WireGuard internal IP address of the client
Now you might be asking yourself, where did I come up with those IPs above? They don't match up with my IP? Did I just make them up? Well you'd be right, I did just make them up!
The RFC 1918 address blocks for IPv4 include 10.0.0.0/8, 172.16.0.0/12, and 192.168.0.0 are all CIDR blocks that are non-routable to the internet, and are perfect ranges to use as the subnet for the VPN in this solution. I just picked a CIDR that didn't conflict with my own VPC or local network. Feel free to update these values if needed, however, be aware of some conflicts on the AWS side with 172.17.0.0/16 and 172.16.0.0/12.
Almost at the finish line, we first need to enable IP forwarding.
# Enable IP forwarding in the kernel
sudo sh -c 'echo "net.ipv4.ip_forward=1" >> /etc/sysctl.conf'
sudo sysctl -p
And finally, we can start the WireGuard server!
# Ensure WireGuard kernel module is loaded
sudo modprobe wireguard

# Enable and start WireGuard
sudo systemctl enable wg-quick@wg0
sudo systemctl start wg-quick@wg0
Step 4: Download and Configure WireGuard Client
Now that we have the hard part out of the way, it's pretty simple from here. Everything going forward I'll do from my local Windows PC.
I'll download the official WireGuard Windows client from WireGuard's install page. There's options to download clients for macOS and many Linux distros here as well.
After installing the WireGuard client, I'll create a local WireGuard configuration file for the client client.conf.
[Interface]
PrivateKey = xxxxxxxxxxxxxxxxxxxxxxxxxxxxxxxxxxxxxxxxxxx=
Address = 192.168.2.2/32

[Peer]
PublicKey = xxxxxxxxxxxxxxxxxxxxxxxxxxxxxxxxxxxxxxxxxxx=
Endpoint = x.x.x.x:51820
AllowedIPs = 10.0.0.0/16, 192.168.2.0/24
A lot of the above is similar to the configuration for the server:
- PrivateKey: Value within the previously created file
client-privatekey - Address: Wireguard internal IP address for the client (this should fall within the server's subnet,
192.168.2.0/24, and be unique across peers) - PublicKey: Value within the previously created file
server-publickey - Endpoint: Public IP of the Wireguard server EC2 instance plus the listen port of the server
- AllowedIPs: CIDR blocks specifying when traffic to specific destinations should go over the WireGuard VPN (here I specify
10.0.0.0/16as the CIDR block for my VPC and192.168.2.0/24as the CIDR block for the newly created WireGuard internal subnet)
Now from the local WireGuard client, click Add Tunnel and select the configuration file you just created. If done right, the client should automatically connect.
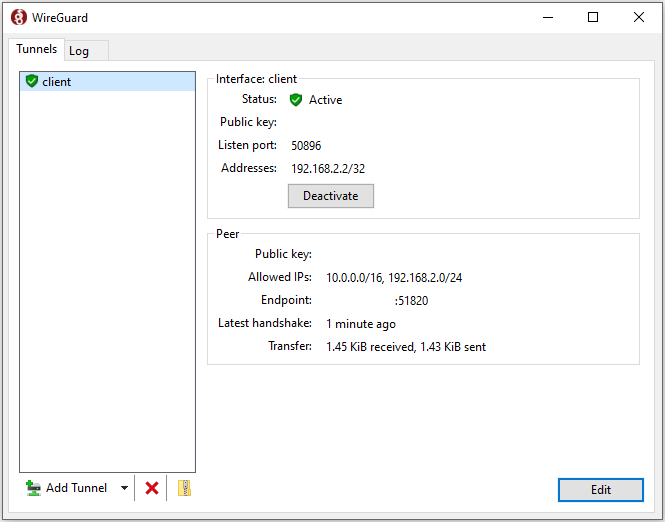
And that's the full solution done! To test out that the VPN works, I can first try pinging the WireGuard server's internal IP from local.
$ ping 192.168.2.1
PING 192.168.2.1 (192.168.2.1) 56(84) bytes of data.
64 bytes from 192.168.2.1: icmp_seq=1 ttl=126 time=51.3 ms
64 bytes from 192.168.2.1: icmp_seq=2 ttl=126 time=22.0 ms
64 bytes from 192.168.2.1: icmp_seq=3 ttl=126 time=24.7 ms
64 bytes from 192.168.2.1: icmp_seq=4 ttl=126 time=22.9 ms
64 bytes from 192.168.2.1: icmp_seq=5 ttl=126 time=25.3 ms
^C
--- 192.168.2.1 ping statistics ---
5 packets transmitted, 5 received, 0% packet loss, time 4007ms
rtt min/avg/max/mdev = 22.019/29.233/51.318/11.104 ms
It works! But now what if I test something closer to a real-life use case? I'll launch a Apache2 server in a private subnet and attempt to access from local using only the private IP.

Again, it works! You can see in the above that I'm connecting to the private instance at 10.0.2.168, the instance's private IP. This quick test proves that the WireGuard VPN was configured correctly and will work to enable direct access to private subnets from my local environment!
Conclusion
That's all there is to it, in just four steps you've set up your own WireGuard VPN and saved over 97% compared to a solution with AWS Client VPN!
There are some things to keep in mind with this solution. Unlike the AWS Client VPN, the self-hosted WireGuard VPN is not elastic, and will not scale with network demands; if you do ever find your network bottlenecking, you should vertically scale your instance to increase network throughput. Another tradeoff worth mentioning is that again, unlike the AWS Client VPN, our solution isn't highly available; if the availability zone hosting our WireGuard server instance goes down, we lose access to the VPN. This might be a red flag for production systems, but when you're just experimenting and developing in your personal AWS account, it's probably an acceptable risk.
Additionally, while only allowing UDP access to the WireGuard server instance from our local IP offers increased security for our networking setup, it's worth noting that oftentimes your local IP will be dynamic, and if/when your local IP changes, you won't be able to connect to the WireGuard server instance without updating the security group rules.