- Published on
Secure Terraform CICD with GitHub Actions and OIDC in AWS
- Authors

- Name
- Michael McCarthy
Automation makes life easier, and coding is no exception. Continuous integration (CI) and continuous deployment (CD), or more commonly referred to collectively as CICD is the coding practice of regularly merging code changes into a central repository or repo coupled with the automation used to build, test and deploy said changes; feel free to dive into a deeper explanation.
When creating and deploying infrastructure with Terraform and other IaC tools, it's tempting to want to move fast and break things, and when a deployment from your local environment is only one terraform apply away, you may ask 'why spend all of this time and effort setting up CICD?'. Without going too much into the details CICD is a simple solution to multiple problems, and you'll immediately get the benefits of automated software release processes, improved developer productivity, improved code quality, and quicker updates.
Setting up a CICD pipeline for Terraform is actually extremely easy, and in this article I'll walk you through setting up your GitHub repo where we'll deploy a simple S3 bucket with GitHub Actions to run our CICD pipeline to AWS. We'll also create GitHub OIDC federated IAM roles to authenticate our CICD pipeline; best practice is to always use IAM roles when authenticating workloads when possible.
If you need a refresher on Terraform, you should start at Create a Simple Terraform Project in AWS.
If you haven't setup a Terraform S3 backend yet, start at Setup a Terraform S3 Remote State in AWS.
Prerequisites
There's a few things you'll need before you walk through this solution:
- An AWS account with the ability to create resources in IAM and S3
- A GitHub account with the ability to create repos and GitHub Actions
- A Terraform S3 Backend and the ability to configure it with a Terraform project
Solution Overview
This solution walks through all steps of creating a a GitHub repo for a Terraform project where we will deploy a simple S3 bucket, complete with a GitHub Actions powered CICD authenticated by GitHub OIDC federated IAM roles.
Step 1: Create GitHub OIDC Identity Provider
The first step in this project is to create the GitHub OIDC identity provider. This is needed so that we can correctly setup the trust policy in the future role we create to authenticate this workload.
To get started navigate to IAM > Identity providers > Add provider and for Provider type select 'OpenID Connect'.
For Provider URL enter 'https://token.actions.githubusercontent.com' and click Get thumbprint to verify the GitHub IdP.
For Audience enter 'sts.amazonaws.com' to allow the STS API to be called by the IdP.
Finally click Add provider to finish creating the identity provider:
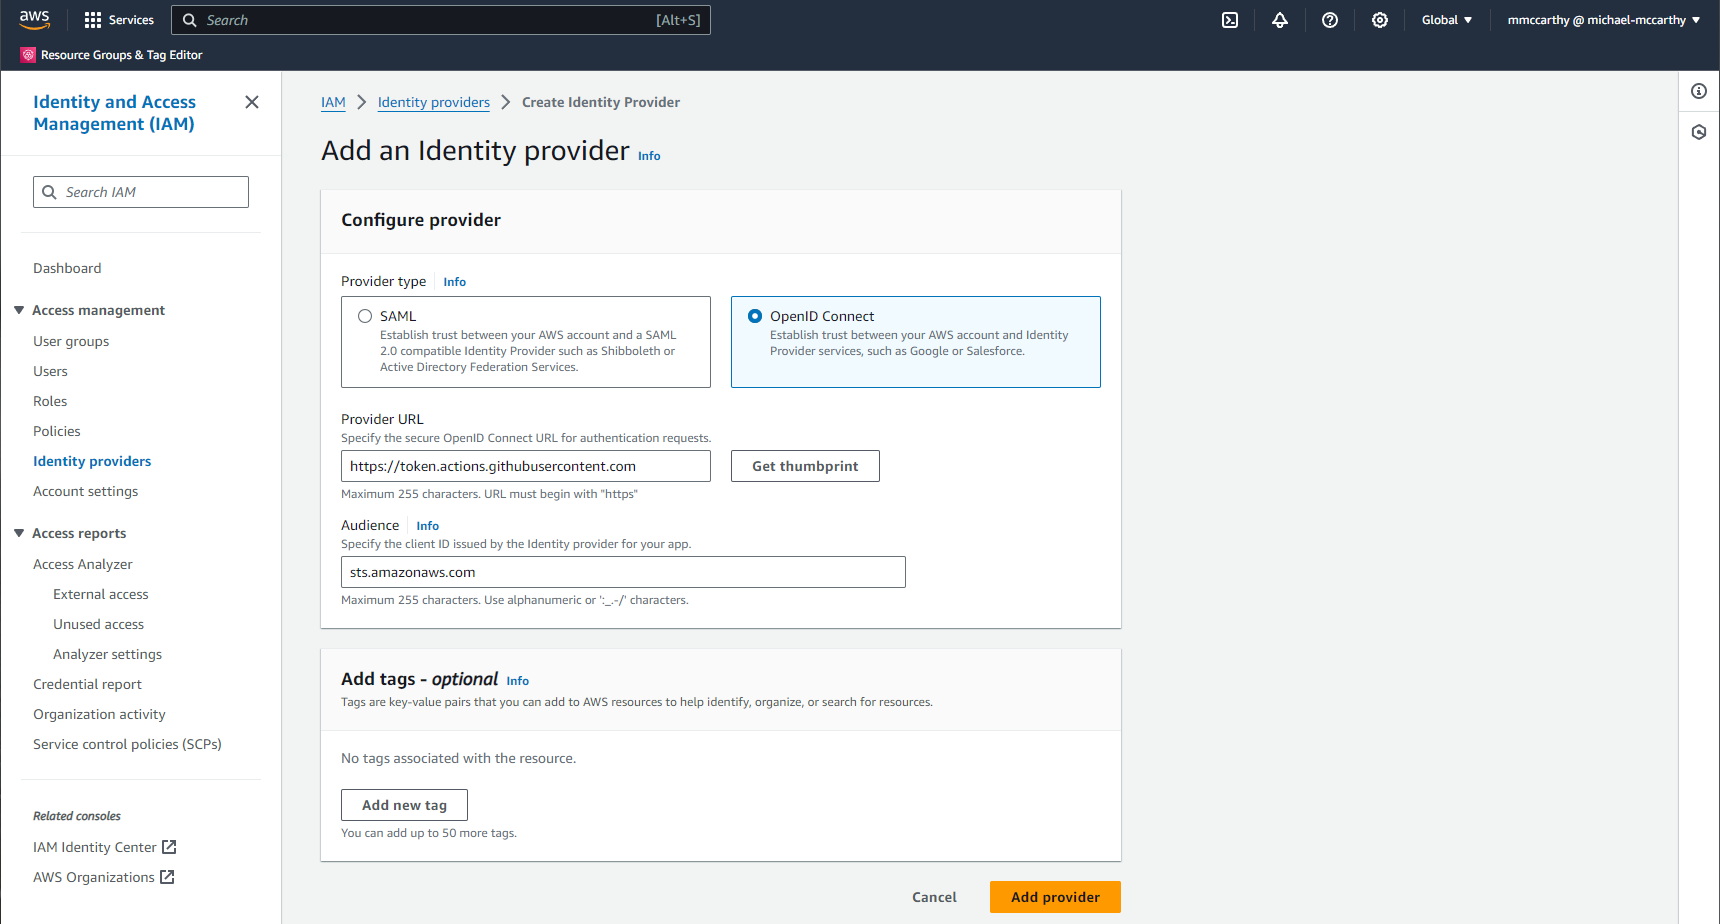
Now if you go to the Identity provider you just created at IAM > Identity providers > token.actions.githubusercontent.com, you see and note the ARN under Summary as you'll need this in your next step.
Step 2: Create Repo-Scoped IAM Role
Now that we have an Identity Provider setup, we can use it to federate a workload to a Role. For the purposes of GitHub OIDC, your workload is basically any process running in a GitHub Action, I'll get into what these means a bit later, but in short it's a serverless computing service provided by GitHub, and scoped to an individual repo. Because GitHub Actions are inherently repo-scoped, it makes sense for us to also scope our OIDC federated roles to individual repos so that we can apply least-privlege permisisons specific to the repo and workload.
Creating an OIDC federated role is no different than creating a normal role, the only change comes in the trust policy. Start by navigating to IAM > Roles > Create role and for Trusted entity type select 'Custom trust policy'. For the Custom trust policy you'll want to enter a policy like this:
{
  "Version": "2012-10-17",
  "Statement": [
    {
      "Effect": "Allow",
      "Principal": {
        "Federated": "arn:aws:iam::004351562122:oidc-provider/token.actions.githubusercontent.com"
      },
      "Action": "sts:AssumeRoleWithWebIdentity",
      "Condition": {
        "StringLike": {
          "token.actions.githubusercontent.com:aud": "sts.amazonaws.com",
          "token.actions.githubusercontent.com:sub": "repo:mmccarthy404/terraform-use-case:*"
        }
      }
    }
  ]
}
Now there's a few things you may or may want to change in your own policy here, but let's break down what exactly is happening. Element by element within the main statement:
Effect- specifies that the statement results in an allow for any API actions specifiedPrincipal- the value set here forFederatedis the GitHub identity provider we created previously; you'll need to update this value with the identity provider ARN created in Step 1Action- the API actions this statement effects;sts:AssumeRoleWithWebIdentityreturns a set of temporary security credentials to users authenticated with GitHub OIDCConditions- specified conditions on when a policy is in effect, and when it's not; here I assert that two values of GitHub's OIDC claim are true usingStringEqualsto test for string equality:token.actions.githubusercontent.com:aud- the audience claim, what GitHub expects to be issuing tokens to, here I only allow access to 'sts.amazonaws.com'token.actions.githubusercontent.com:sub- the subject claim, identifying the user at the issuer (GitHub), here I only allow access when the user is a repo from the account or organization 'mmccarthy404' and the repo is named 'terraform-use-case'; you need to customize this value for your own use cases
This is also a good time to say that you have some flexibility on how permissive or restrictive you want to be with this role. For example, if I didn't care about what repo in my account or organization to restrict access to here, I can be much more permissive by moving up the wildcard in my subscription assertion to let any repo in 'mmccarthy404' assume this role:
...
"Condition": {
  "StringLike": {
    "token.actions.githubusercontent.com:aud": "sts.amazonaws.com",
    "token.actions.githubusercontent.com:sub": "repo:mmccarthy404/*"
  }
}
...
However, this conditions is much less restrictive, and could lead to permissions elevation by other repos in the account or organization, so take great consideration when updating this. For more insight check out the AWS documentation on configuring a role for GitHub OIDC identity provider.
When you're satisfied with your trust policy click Next:
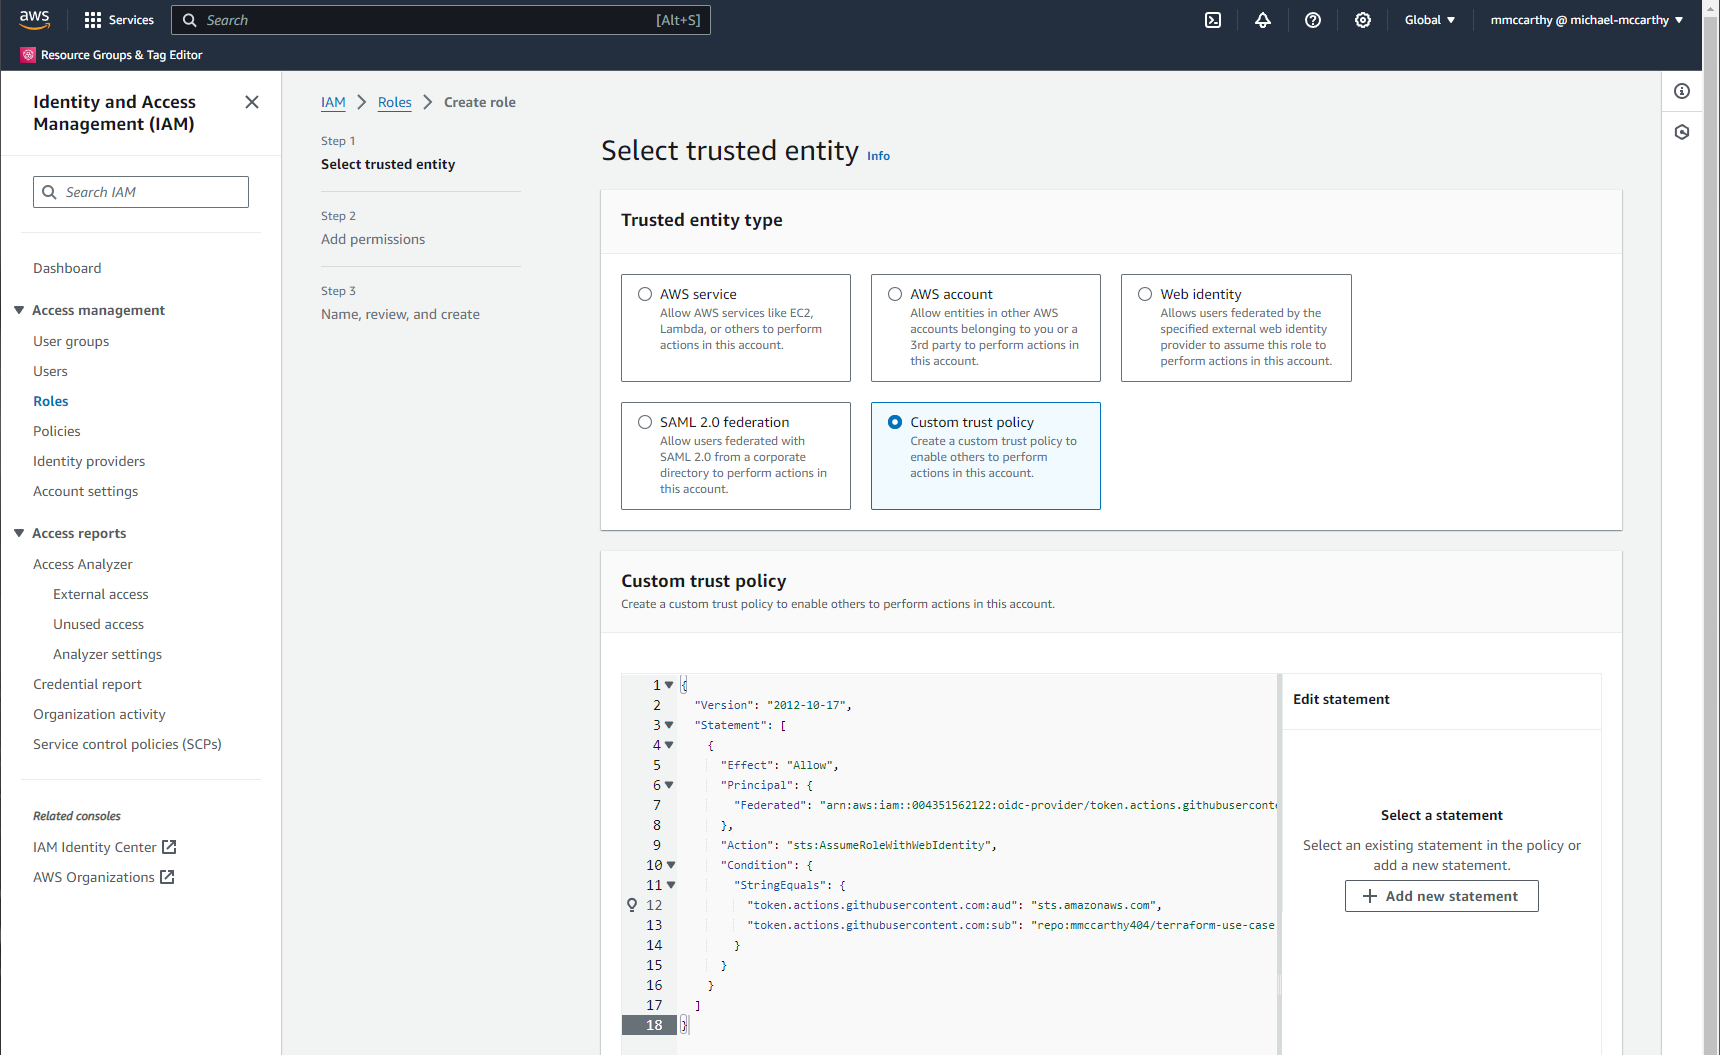
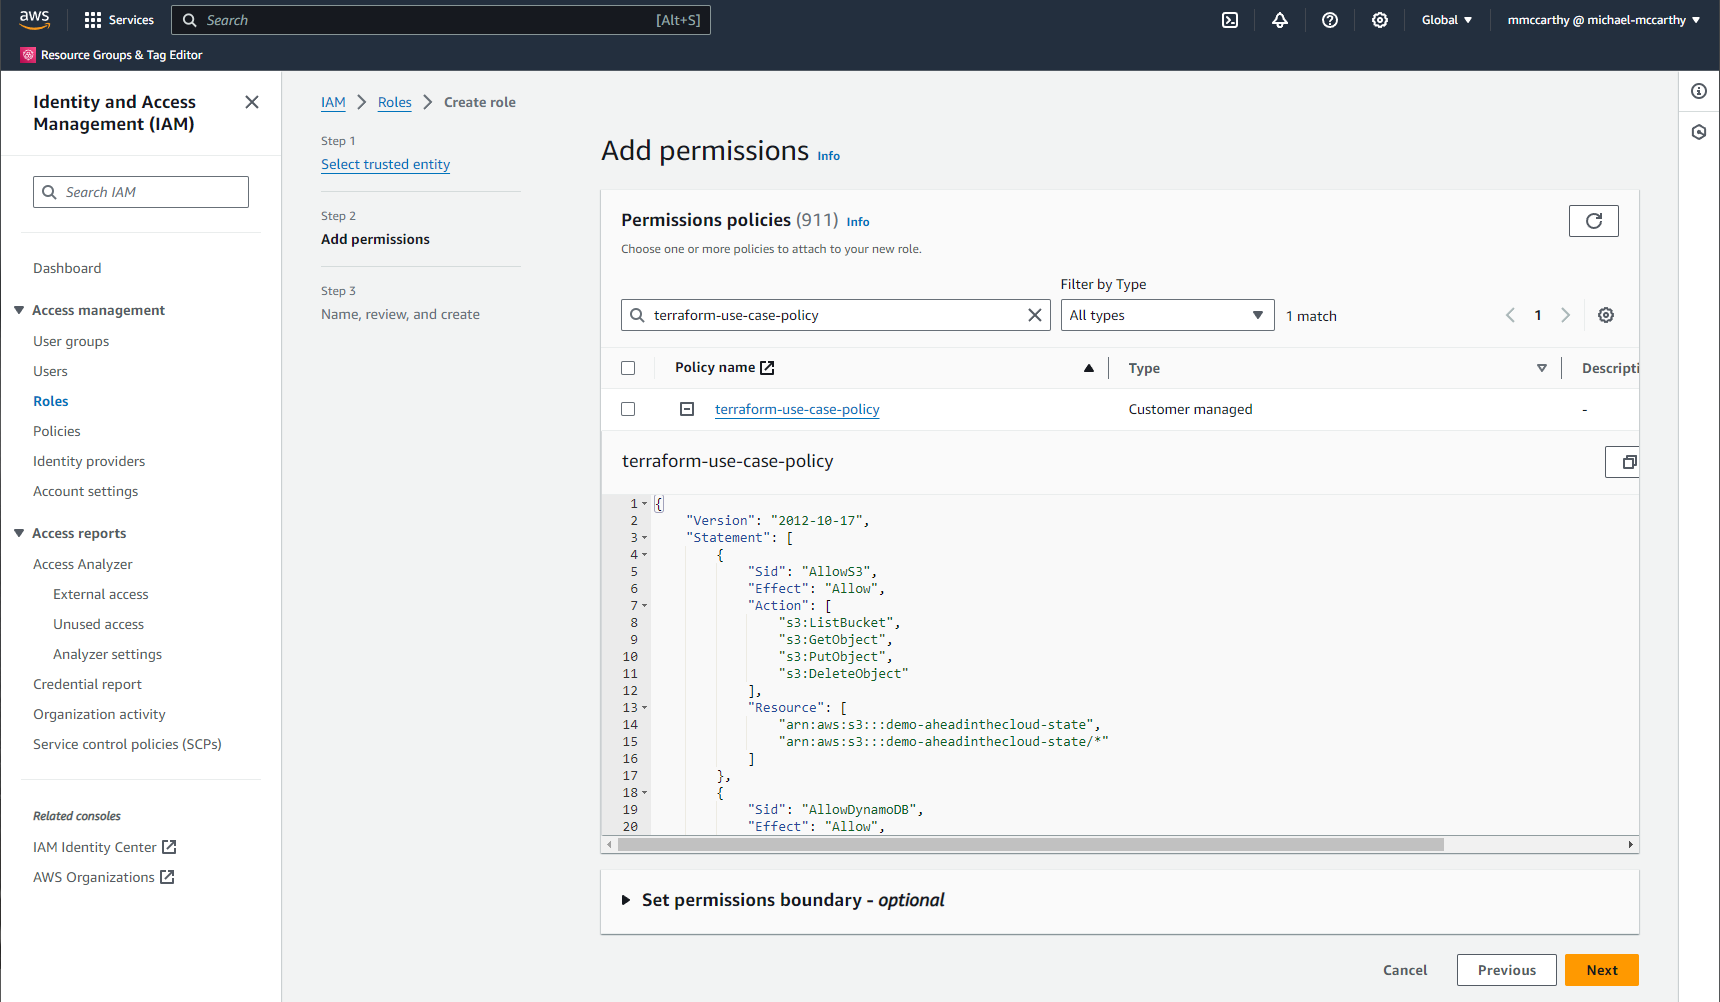
In the next step you'll need to add permissions to the role, and any repo matching your previous trust policy will be able to call whatever underlying AWS API requests within your account, so it's important that you apply least-privilege permissions here.
I'm assigning the custom policy 'terraform-use-case-policy' that we created previously in Setup a Terraform S3 Remote State in AWS with the Policy JSON seen below:
{
    "Version": "2012-10-17",
    "Statement": [
        {
            "Sid": "AllowS3",
            "Effect": "Allow",
            "Action": [
                "s3:ListBucket",
                "s3:GetObject",
                "s3:PutObject",
                "s3:DeleteObject"
            ],
            "Resource": [
                "arn:aws:s3:::demo-aheadinthecloud-state",
                "arn:aws:s3:::demo-aheadinthecloud-state/*"
            ]
        },
        {
            "Sid": "AllowDynamoDB",
            "Effect": "Allow",
            "Action": [
                "dynamodb:DescribeTable",
                "dynamodb:GetItem",
                "dynamodb:PutItem",
                "dynamodb:DeleteItem"
            ],
            "Resource": "arn:aws:dynamodb:*:*:table/demo-aheadinthecloud-state-lock"
        },
        {
            "Sid": "AllowUseCase",
            "Effect": "Allow",
            "Action": [
                "s3:*"
            ],
            "Resource": "*"
        }
    ]
}
You can have any policy JSON you want here, however, if you're going to be using an S3 backend within the same AWS account that you want to authenticate to using this same role, you'll need to include the AllowS3 block and optionally the AllowDynamoDB block if you're also using DynamoDB for state locking; make note that these blocks have Resource elements that will need values unique to your specific use case, so update accordingly.
The AllowUseCase block is created as a general catchall for use case specific required actions. You can do pretty good from a least-privileges permissions perspective if you just make sure that the Action element in this block is updated with the unique actions you're individual repos and roles require. Here I allow all API actions with 'S3:*'.
Once you've added your permissions click Next:
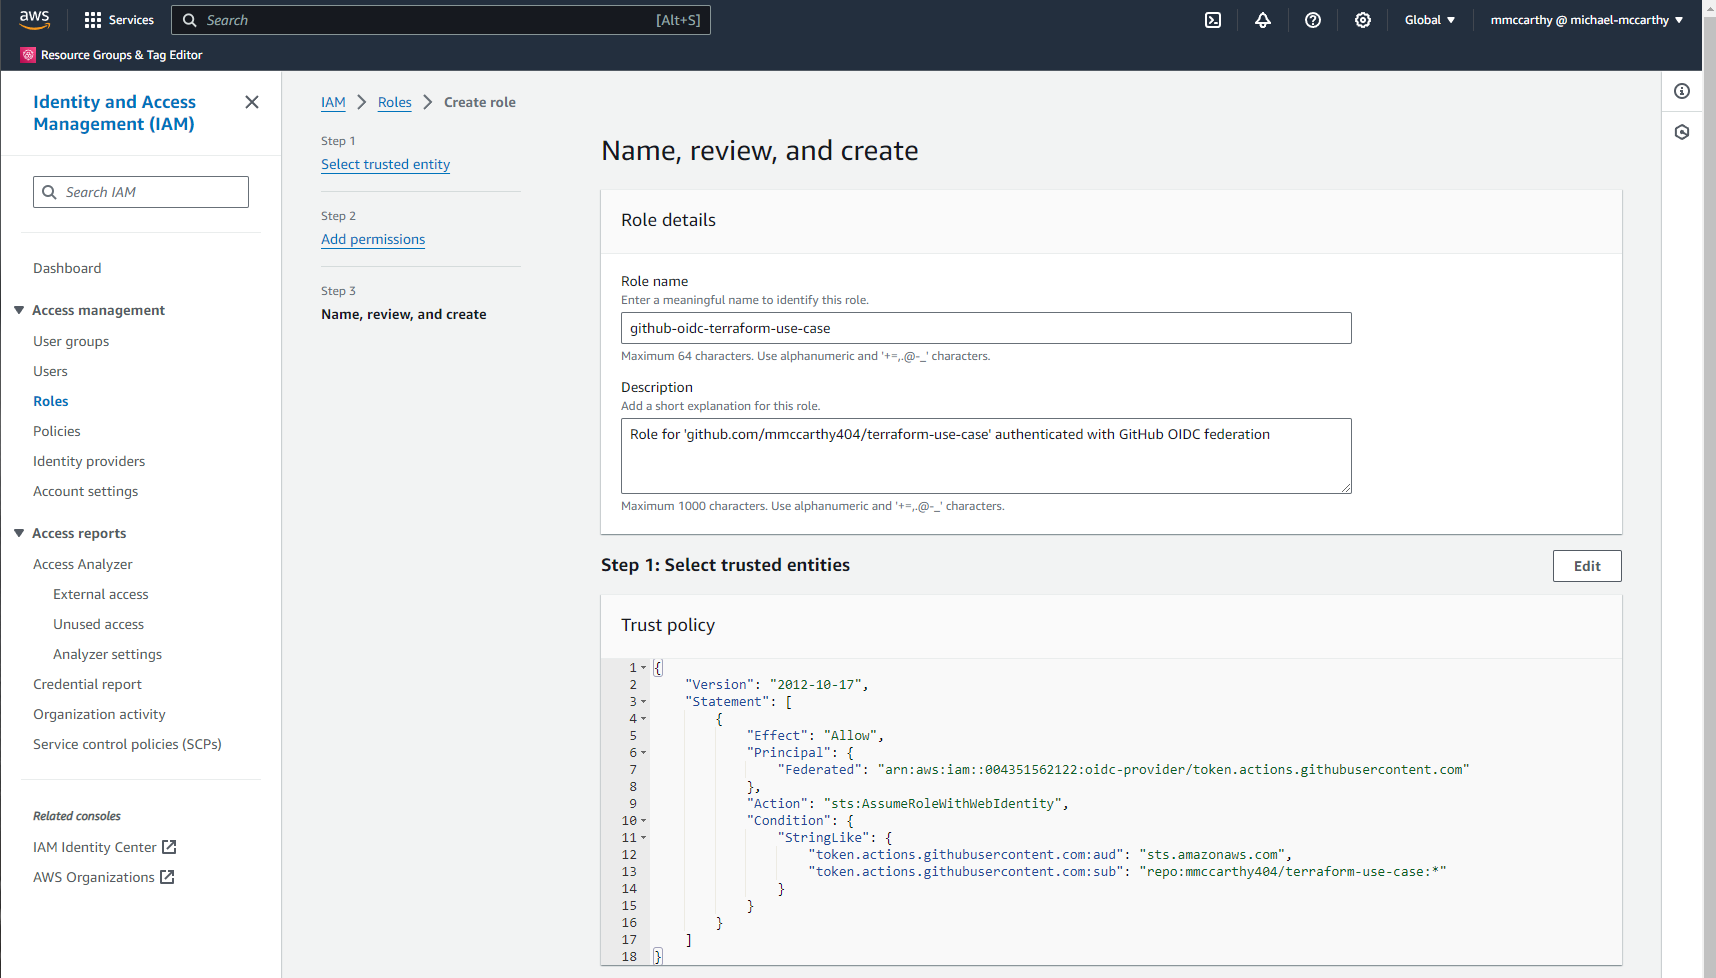
On the final page, give some meaningful value for Role name, I'll use 'github-oidc-terraform-use-case' and an optional value for Description and click Create role to finalize role creation:
Step 3: Create GitHub Repo
The final piece of the puzzle here is to create the repo. Git is a version control system ubiquitous in the industry and used by developers globally to version their code. GitHub is just a web-based Git repository, which makes it simple to collaborate and share code both publicly and privately. So while the two are often referred to synonymously, they aren't the same, and you can have Git without GitHub, but you can't have GitHub without Git! Going into the intricates of Git and GitHub is out of scope for this blog, but look into GitHub's Git tutorial and GitHub tutorial for a more technical deep-dive on each. For this article I'll walk though setup from within GitHub's UI.
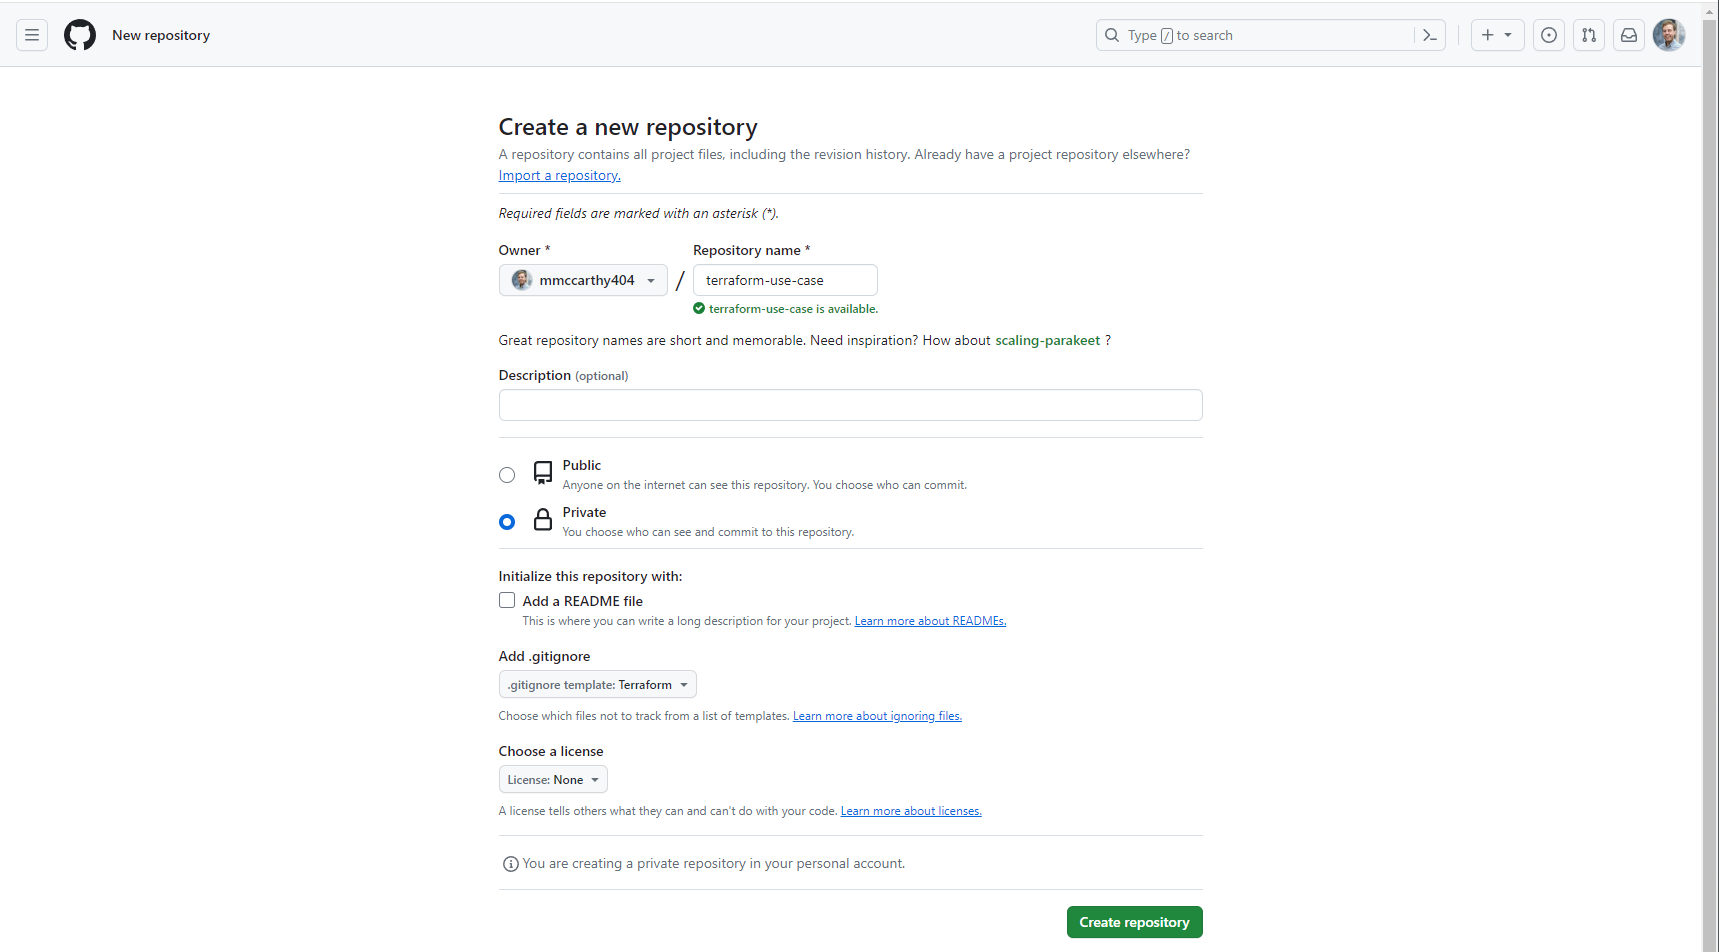
To start, I'll navigate GitHub's Create a new repository form and specify both a Owner and Repository name for my new repository, I'll use 'mmccarthy404' and 'terraform-use-case' respectfully. The values here need to match the values specified in the previously created role's trust policy token.actions.githubusercontent.com:sub assertion exactly.
You can give an optional description and select Private for visibility. This solution will work exactly the same for both public and private repos, but because public repos run the risk of having secrets accidentally committed and leaked, it's safer to remove that risk.
For Add .gitignore click the dropdown and select 'Terraform', to start with a generic Terraform .gitignore file.
Click Create repository to create your new repo:
Step 4: Create Terraform Project
Now that we have the repo created, let's create some code to put in it. I'll be doing this directly in the GitHub UI by clicking into Add file > Create new file button directly in the new GitHub repo:
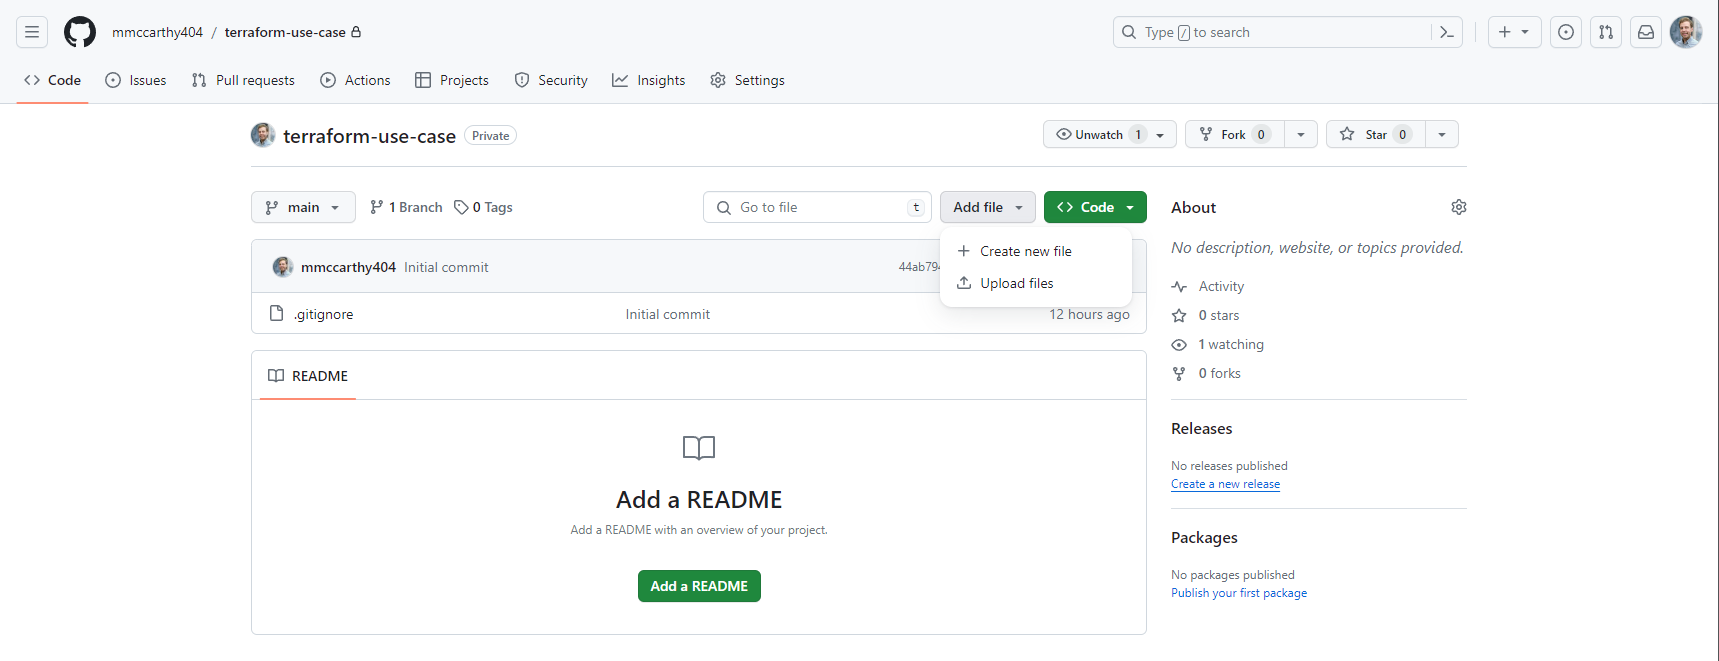
Feel free to create these files locally with Git or GitHub Desktop as well; as long as you can eventually get this all to the 'main' branch of your new GitHub repo, you'll be good to go! If you're continuing on from Setup a Terraform S3 Remote State in AWS you can push your local code directly to GitHub with Git after you setup command line authentication. From the working directory of your local project:
git init
git remote add origin https://github.com/mmccarthy404/terraform-use-case.git
git checkout -b main
git pull origin main
git add .
git commit -m 'Create Terraform project'
git push origin main
But for everyone just joining now, we'll need to create a new file main.tf directly in the root of our repo:
terraform {
  backend "s3" {
    bucket         = "demo-aheadinthecloud-state"
    key            = "terraform-use-case"
    region         = "us-east-1"
    dynamodb_table = "demo-aheadinthecloud-state-lock"
  }
  required_providers {
    aws = {
      version = ">= 5.33.0"
      source  = "hashicorp/aws"
    }
  }
}

resource "aws_s3_bucket" "example" {
  bucket = "terraform-use-case-bucket-2"
}
I want to stress the importance of the backend block in the above code. When you're just playing around locally, it might be OK to use a local state file for state management. However, as soon as you centralize your code base you also need to centralize your state file! Otherwise, there's nothing to stop two separate developers from maintaining two separate state files locally leading to many failed deployments and headaches. Because we're using an S3 backend for our state, make sure that the referenced S3 bucket and DynamoDB table exist in your AWS account and your OIDC role has permissions to each!
That's our project done. At this stage, we've centralized our codebase in GitHub, and if I had a few friends or colleagues I wanted to work on this project with, we could streamline our collaboration through pulling and pushing from this shared GitHub repo. This is the Integration part of CICD. Next we'll look into creating the Deployment!
Step 5: Create GitHub Action for Terraform CICD
In the final step of this solution, we'll create the actual GitHub Action that will power our CICD pipeline. As mentioned previously, GitHub Actions are serverless offerings from GitHub which allows users to automate a set of functions to run (synchronously or asynchronously) in response to some event orchestrated by a YAML file known as a GitHub Actions workflow. GitHub Actions are frequently used to automate deployments due to their tight integrations with GitHub and the fact that they're essentially free for GitHub-hosted runners in public and private repositories.
This solution using GitHub OIDC federated IAM roles to authenticate from GitHub to AWS is fully extensible to any use case, and leans on AWS's configure AWS credentials action. For this example, we'll be setting up a Terraform deployment based around one of Terraform's example CICD actions. Start by creating a new file in your GitHub repo named .github/workflows/terraform-cicd.yaml It's very important that the prefix is .github/workflows/ so that GitHub knows to treat terraform-cicd.yaml as a workflow:
name: terraform-cicd

on:
  push:
    branches:
      - 'main'
  pull_request:

permissions:
  id-token: write
  contents: read
  pull-requests: write

jobs:
  terraform-cicd:
    name: terraform-cicd
    runs-on: ubuntu-latest

    steps:
    - name: Checkout
      uses: actions/checkout@v4

    - name: Setup Terraform
      uses: hashicorp/setup-terraform@v3

    - name: Terraform fmt
      id: fmt
      run: terraform fmt -check

    - name: Configure AWS Credentials
      uses: aws-actions/configure-aws-credentials@v4
      with:
        role-to-assume: arn:aws:iam::004351562122:role/github-oidc-terraform-use-case
        aws-region: us-east-1

    - name: Terraform Init
      id: init
      run: terraform init

    - name: Terraform Validate
      id: validate
      run: terraform validate -no-color

    - name: Terraform Plan
      id: plan
      run: terraform plan -no-color

    - name: Write Plan
      uses: actions/github-script@v6
      if: github.event_name == 'pull_request'
      env:
        PLAN: "terraform\n${{ steps.plan.outputs.stdout }}"
      with:
        github-token: ${{ secrets.GITHUB_TOKEN }}
        script: |
          const output = `#### Terraform Format and Style 🖌\`${{ steps.fmt.outcome }}\`
          #### Terraform Initialization ⚙️\`${{ steps.init.outcome }}\`
          #### Terraform Validation 🤖\`${{ steps.validate.outcome }}\`
          <details><summary>Validation Output</summary>

          \`\`\`\n
          ${{ steps.validate.outputs.stdout }}
          \`\`\`

          </details>

          #### Terraform Plan 📖\`${{ steps.plan.outcome }}\`

          <details><summary>Show Plan</summary>

          \`\`\`\n
          ${process.env.PLAN}
          \`\`\`

          </details>

          *Pusher: @${{ github.actor }}, Action: \`${{ github.event_name }}\`, Working Directory: \`${{ env.tf_actions_working_dir }}\`, Workflow: \`${{ github.workflow }}\`*`;

          github.rest.issues.createComment({
            issue_number: context.issue.number,
            owner: context.repo.owner,
            repo: context.repo.repo,
            body: output
          })

    - name: Terraform Apply
      if: github.event_name == 'push'
      run: terraform apply
With this final file in place, we're done with implementation of this solution! Now let's break down what the above file is doing:
name: terraform-cicd

on:
  push:
    branches:
      - 'main'
  pull_request:
In the beginning, we give the workflow a name and configure the workflow to run whenever we either push to 'main' or create a pull request.
permissions:
  id-token: write
  contents: read
  pull-requests: write
Next we define permissions for our workflow, this is optional, but recommended, and helps us to continue least-privilege permissioning in this solution. Technically, our aws-actions/configure-aws-credentials action requires the permission id-token: write permission to create the JWT required for us to assume the OIDC federated role and our actions/github-script action requires the permission pull-requests: write to write to our pull request. However, once you specify access for any scopes in GitHub, all other unspecified scopes are set to none, so in order for out action to actually see our repo, we also need to add the permission pull-requests: write.
jobs:
  terraform-cicd:
    name: terraform-cicd
    runs-on: ubuntu-latest
...
A job is a set of steps in a workflow that all all executed on the same runner, with all steps being executed in order and dependent on each other. Jobs themselves are run in parallel without dependencies by default, but you're able to explicitly set dependencies if needed. Here we only need one job for our purposes. We name it 'terraform-cicd' and explicitly set it to run on 'ubuntu-latest'. Inside our job we have a number of steps, either calling actions or shell commands:
Checkout- checkout your repository so that the workflow can access itSetup Terraform- setup Terraform CLITerraform fmt- check formatting standardizationConfigure AWS Credentials- generate a JWT and assume the GitHub OIDC role for the workflow; You need to modify the value forrole-to-assumehere with the ARN of the role you created in Step 2Terraform Init- initialize backend and provider pluginsTerraform Validate- validate Terraform configurationTerraform Plan- create plan of required changesWrite Plan- write plan to pull request if the workflow was trigger by a pull requestTerraform Apply- apply plan to your environment if the workflow was triggered by a push
Step 6: Demo Terraform CICD
Now that everything's setup let's test the full solution out in action! I can do this by creating a small change to main.tf through a pull request to the 'main' branch of our my repo, just changing the bucket name from 'terraform-use-case-bucket-2' to 'terraform-use-case-bucket-3':
terraform {
  backend "s3" {
    bucket         = "demo-aheadinthecloud-state"
    key            = "terraform-use-case"
    region         = "us-east-1"
    dynamodb_table = "demo-aheadinthecloud-state-lock"
  }
  required_providers {
    aws = {
      version = ">= 5.33.0"
      source  = "hashicorp/aws"
    }
  }
}

resource "aws_s3_bucket" "example" {
  bucket = "terraform-use-case-bucket-3"
}
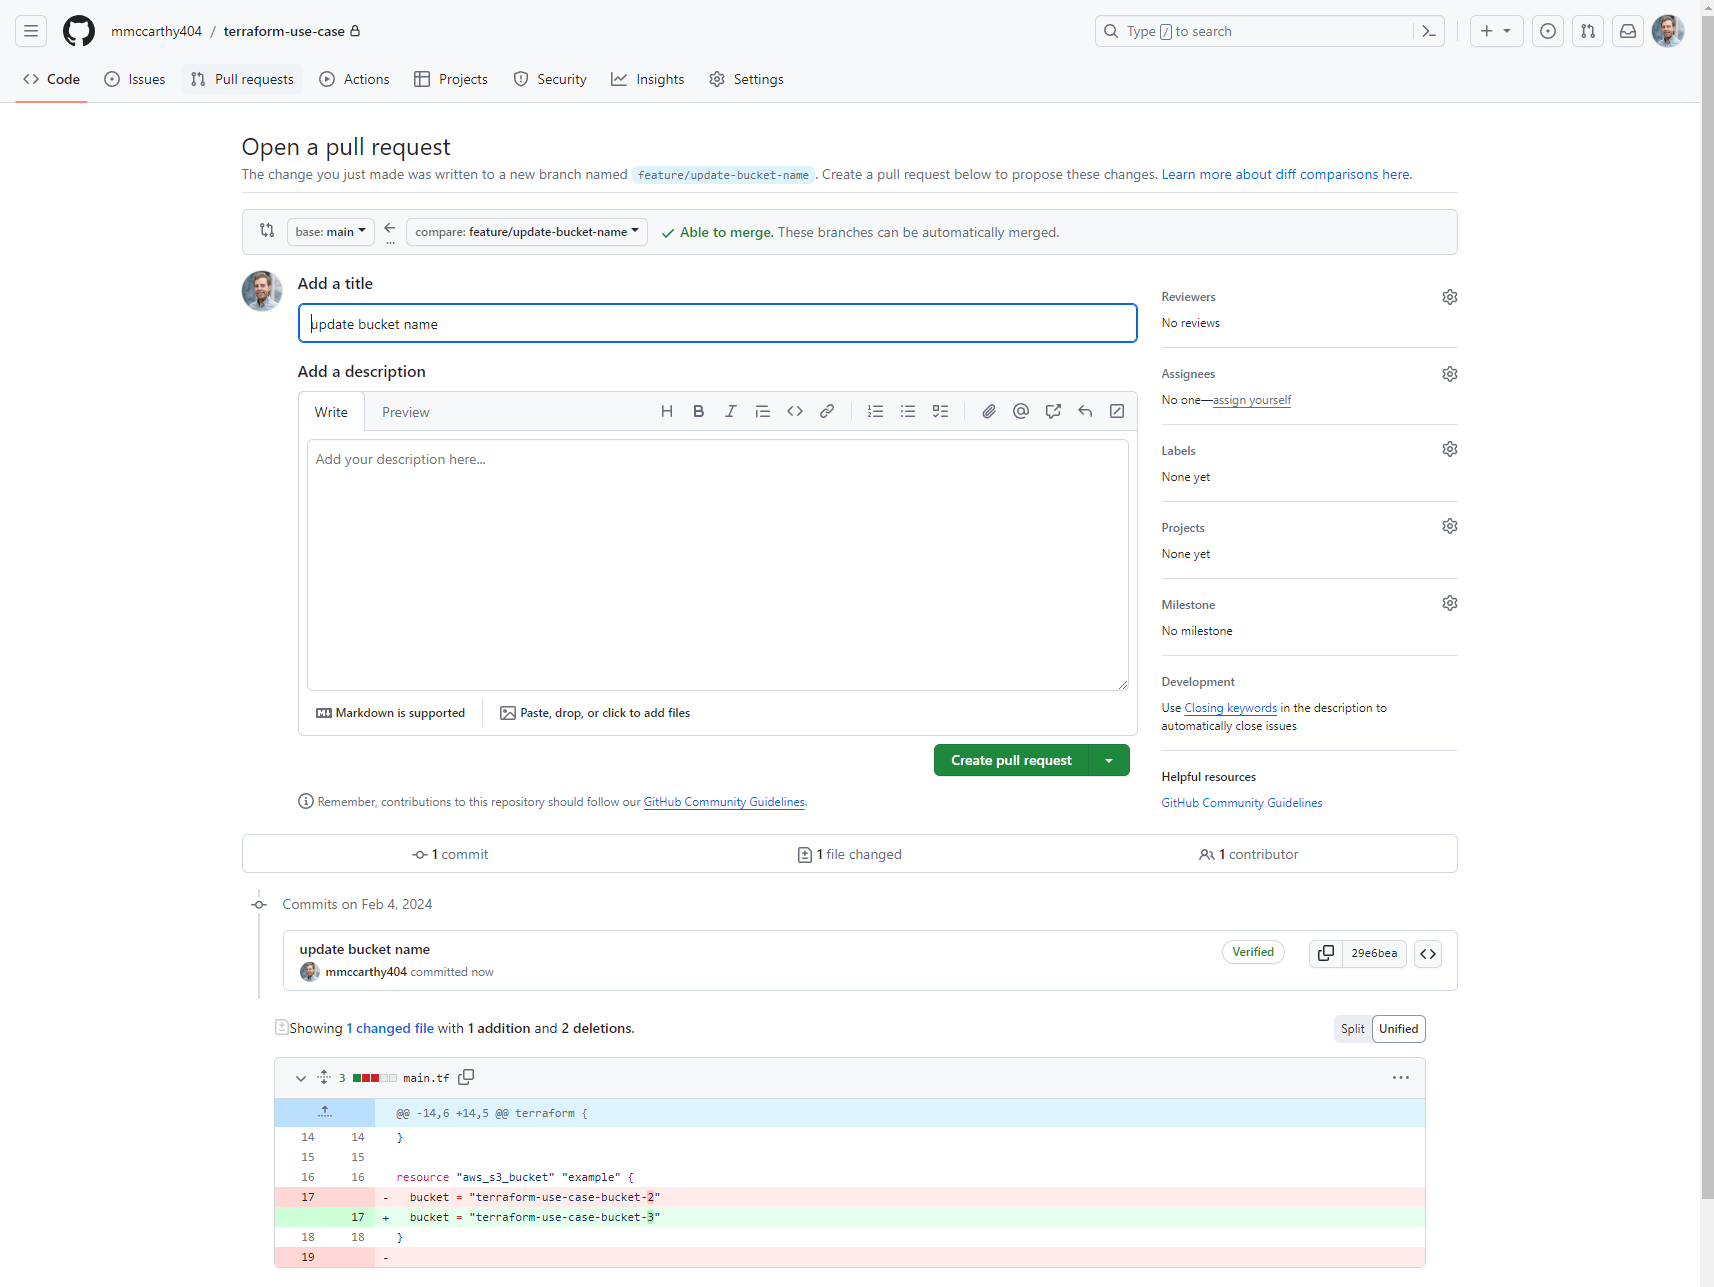
As soon as I click Create pull request here, our GitHub Actions workflow is triggered, and soon you'll see it write it's output directly to the pull request, including the status of the terraform fmt, terraform init, terraform validate, and terraform plan steps:
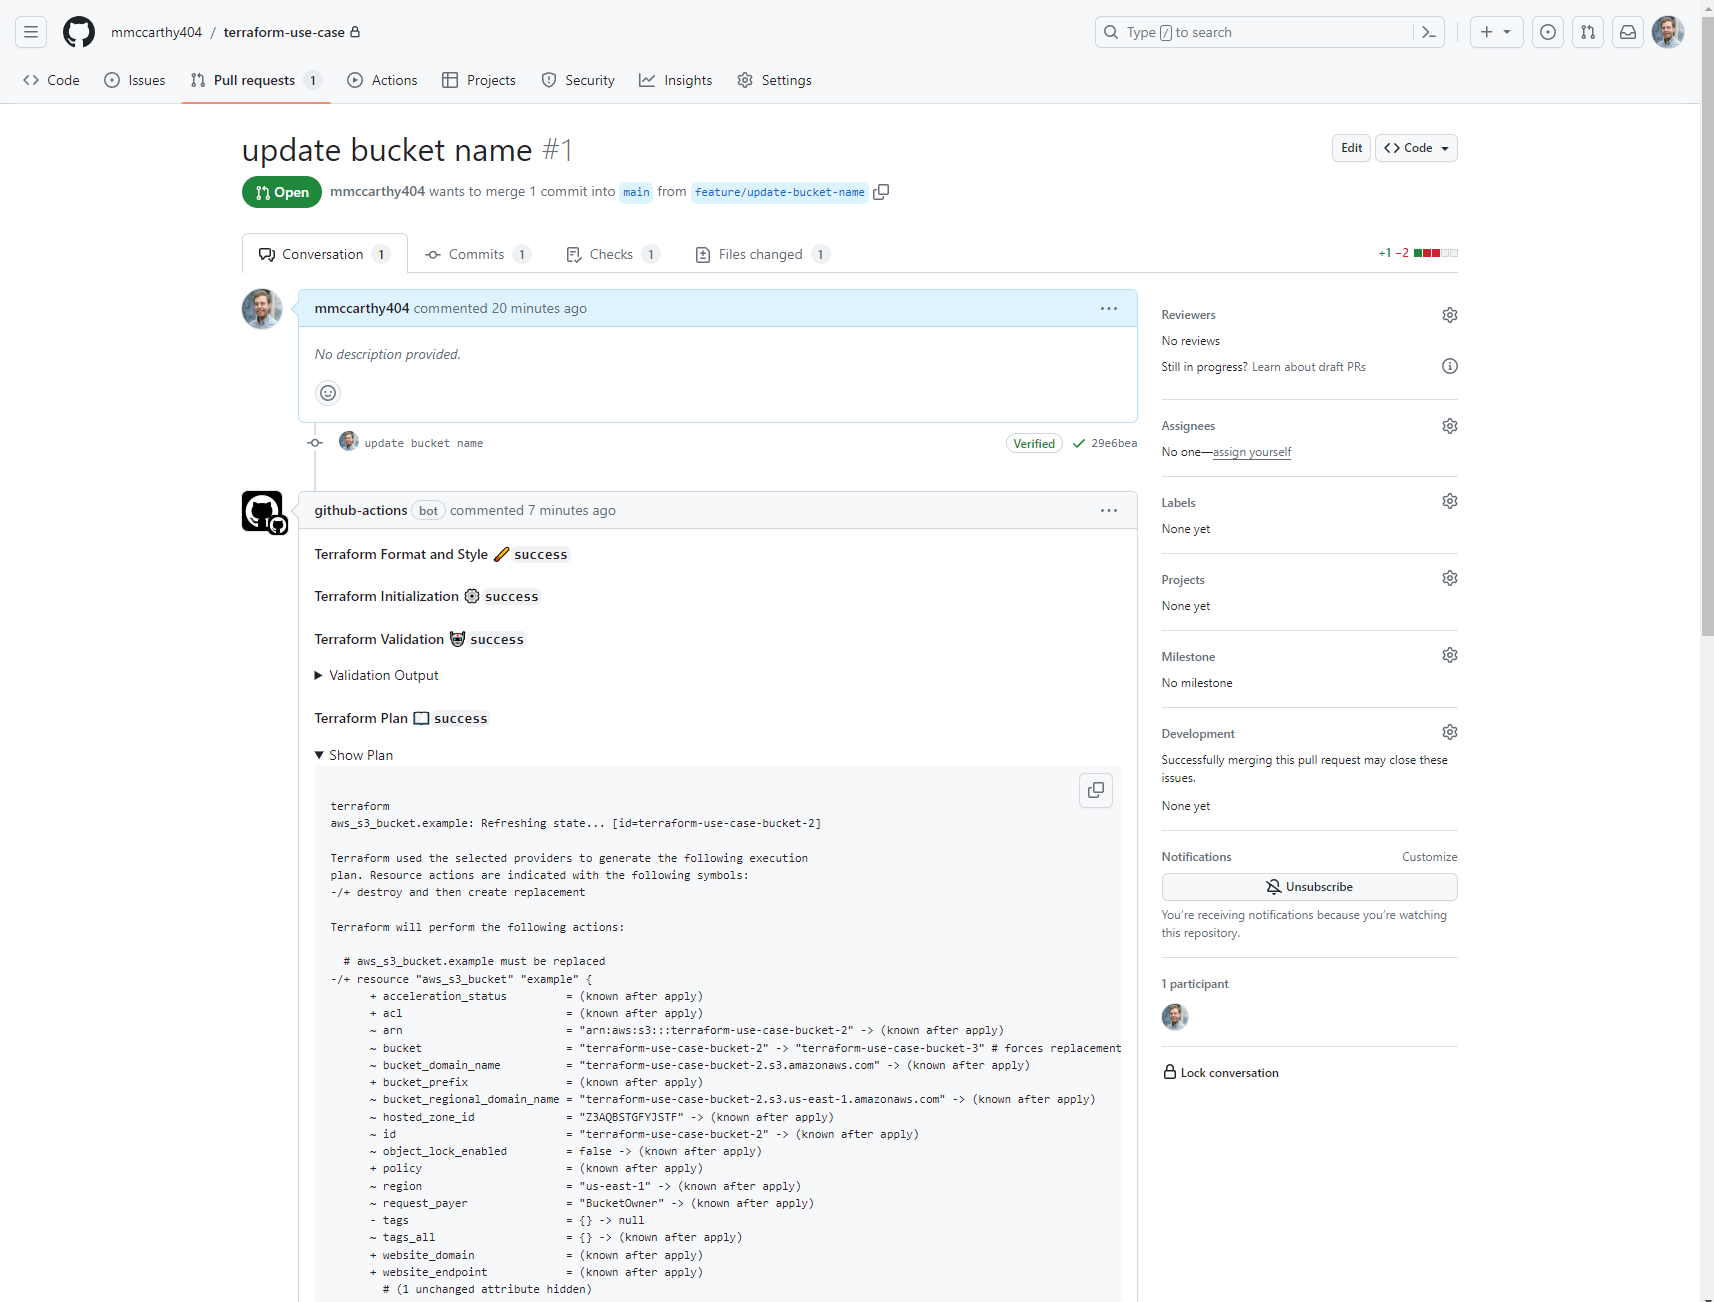
Having checks for formatting and validation here is super helpful, and it helps you or anyone else working on your code base know when a pull request should or shouldn't be merged. The plan is also very helpful for you to review ahead of merging your changes as it gives you a detailed breakdown of what resources will be created, updated, or destroyed from merging, and applying, your pull request. For example, here I can see that one resource, aws_s3_bucket.example must be replaced because I changed the bucket name. This is expected so I can decide to go ahead and merge my changes clicking Merge pull request.
Now the second part of our CICD pipeline runs, the actual deployment! Remember how the GitHub Actions workflow was triggered by both pull request and push to main? Well one a pull request to main is approved, that's a push, and our workflow runs a second time, however, once it gets to the Terraform Apply step, it passes the conditional and executes:
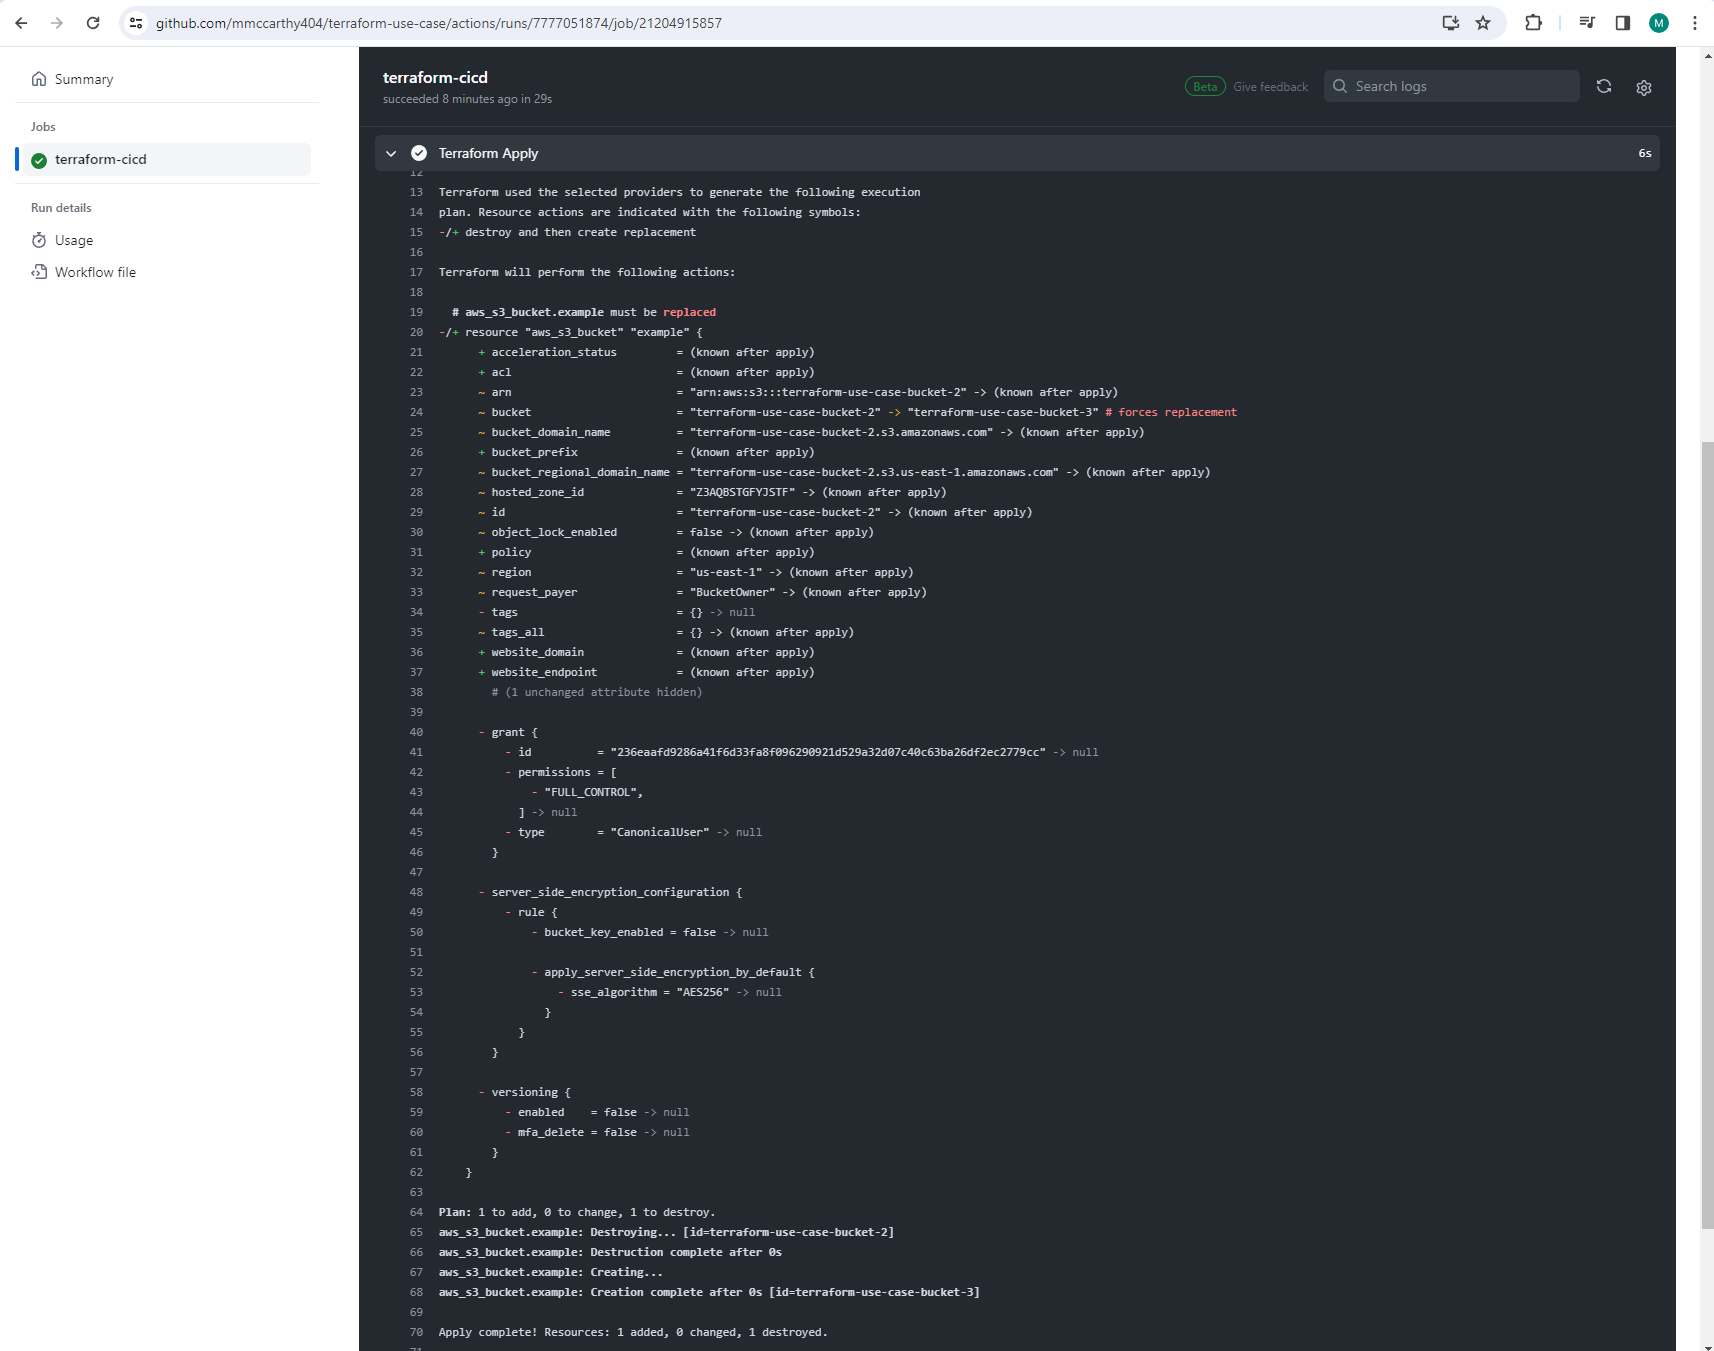
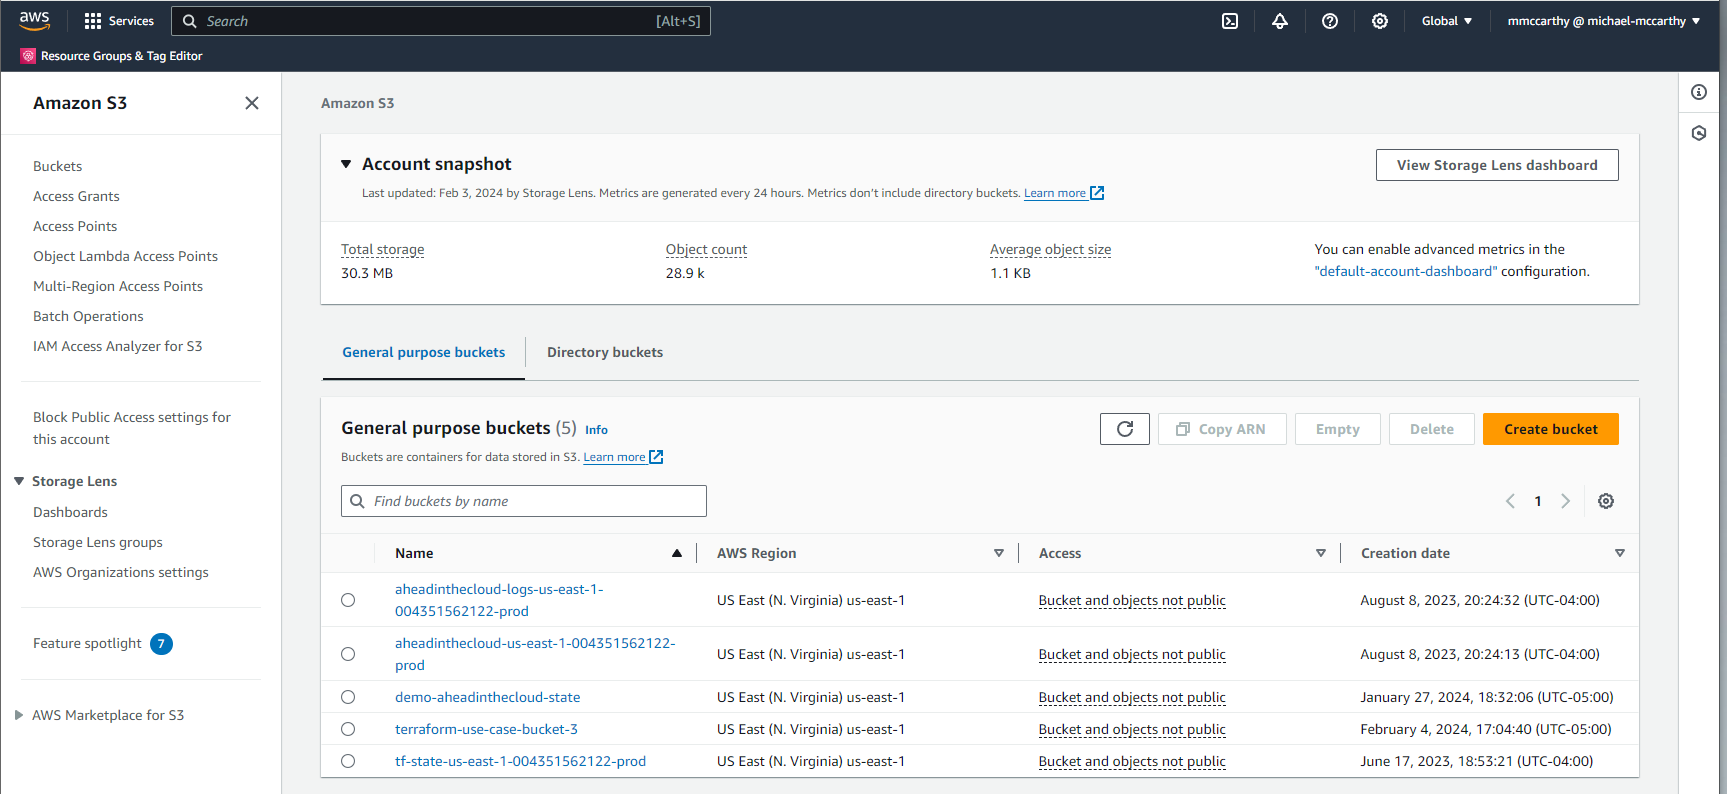
Success! The output from our action looks like the automation worked perfectly, the original bucket was destroyed and a new one created in it's place called 'terraform-use-case-bucket-3'! Once more we can validate in console to confirm we see the bucket:
Conclusion
That's all it takes to setup a successful Terraform CICD with GitHub Actions and GitHub OIDC federated IAM roles! I demoed this with the smallest possible project, but there's really no limit to how complex your project can be, you'll follow the same general steps every time, and this scales extremely well to large Terraform projects. The only potential limits you should note is that the default TTL for a role's STS token is 1 hour, and if your terraform apply will take longer than this, it will timeout before finishing and potentially corrupt your state as it would immediately lose access to the Terraform S3 backend. It's possible to update your role to be valid for up to 12 hours, however, then you could potentially run into limits with the maximum runtime for GitHub Actions workflows which is 6 hours.
Also, using GitHub OIDC to federate access to IAM roles is a powerful tool that extends to far greater use cases than just Terraform CICD. You can use this same solution to federate actions to any AWS services, including Lambda, DynamoDB, or S3; there's really no limit to what you can do here, and you should experiment!
Lastly, here I demoed the setup directly through the AWS console, but in practice, it's best practice to do everything through IaC. I personally have a single Terraform repo responsible for both the Terraform S3 backend and GitHub OIDC federated roles across all of my projects. Whenever I start a new project, I create a new GitHub repo and add the repo to a repos variable to fully automate everything!