- Published on
Setup a Terraform S3 Remote State in AWS
- Authors

- Name
- Michael McCarthy
If you use Terraform in a team or in any serious projects, you can't afford to use the default local backend. Aside from the impracticalities that come about trying to hypothetically share a local backend across a development team, you'll constantly run the risk of your state being accidentally deleted, and in larger Terraform projects, that means that hundreds of resources could get orphaned across your AWS account(s), requiring manual deletion. And believe me, I can tell you from experience it's not fun...
It's not hard at all to create an S3 remote state in AWS and migrate your local state over. At a minimum all you need is a single S3 bucket to hold the state file. We can make this even better adding a single DynamoDB table for state locking, and in this article we'll do just that!
If you've never worked with Terraform before, I would encourage starting with Create a Simple Terraform Project in AWS.
Prerequisites
There's a few things you'll need before you walk through this solution:
- An AWS account with the ability to create resources in IAM, S3, and DynamoDB
- A local development environment (Mac OS, Windows, or Linux) with AWS CLI and Terraform installed
Solution Overview
This solution creates a local Terraform project and demonstrates apply and destroy actions using a local state. Required infrastructure for a Terraform S3 remote state is manually provisioned in AWS including a versioned S3 bucket and a DynamoDB table. An IAM policy used to provision the state is updated with least-privilege permissions. The local Terraform project is integrated with the remote state infrastructure though creation and configuration of a backend block in Terraform. Finally, the Terraform project is deployed to AWS and the remote state infrastructure is observed to show the new state file and state lock.
Step 1: Creating a Terraform Project
In this article we'll focus on an extremely simple project, just a simple S3 bucket, but in practice you can go as complex as you want! If you read my previous article Create a Simple Terraform Project in AWS, you'll notice I'm picking up right where we left off!
Locally I'll create a directory to start my Terraform project, here I just name it terraform-use-case:
mkdir terraform-use-case && cd terraform-use-case
And I'll create a single simple main.tf:
terraform {
  required_providers {
    aws = {
      version = ">= 5.33.0"
      source = "hashicorp/aws"
    }
  }
}

resource "aws_s3_bucket" "example" {
  bucket = "terraform-use-case-bucket"
}
I quickly download all required plugins with init:
terraform init
And finally apply :
terraform apply
Currently my local Terraform deployment is authenticating to AWS using AWS CLI which currently authenticates with IAM User Access Keys. This is the current IAM Policy attached to that user:
{
	"Version": "2012-10-17",
	"Statement": [
		{
			"Sid": "AllowUseCase",
			"Effect": "Allow",
			"Action": [
			     "s3:*"
			],
			"Resource": "*"
		}
	]
}
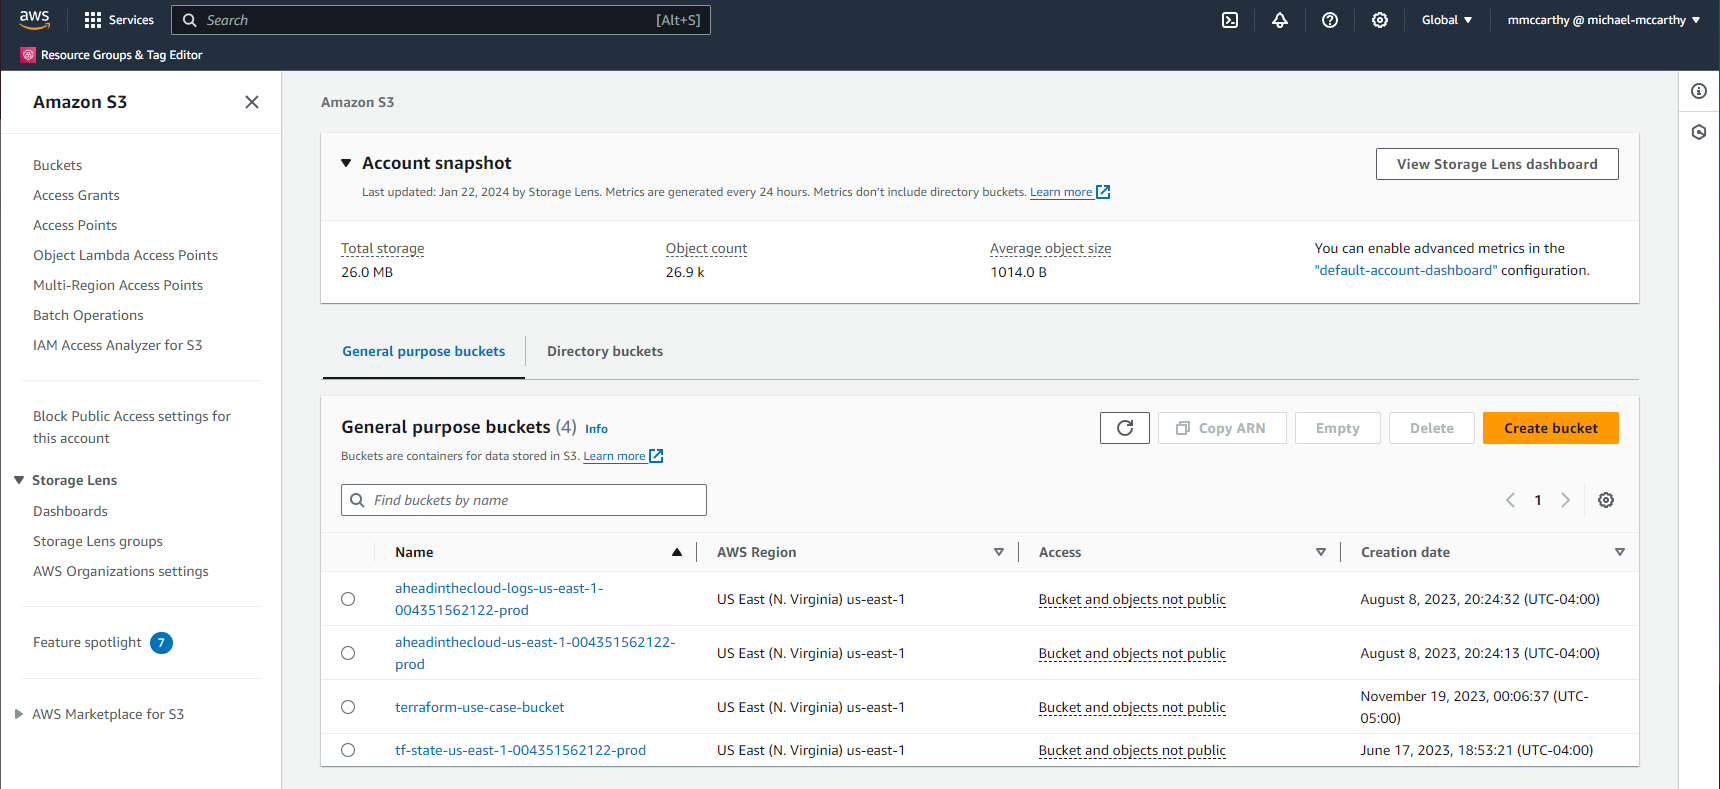
After running the apply, I can verify the new bucket through the console!
To prepare for the next step I'll tear down this deployment with destroy:
terraform destroy
Now maybe you noticed that when you ran apply two new files were created in your directory:
ls
main.tf terraform.tfstate terraform.tfstate.backup
terraform .tfstate is your actual state, and terraform.tfstate.backup is the backup of that state. You'll find the information about all Terraform-managed resources in these two files, and the state file is what Terraform uses as it's source of truth as far as ownership goes.
Step 2: Create S3 Backend Infrastructure
The Terraform S3 backend does two things really well:
- Uses an S3 bucket, preferably versioned, to centralize Terraform state securely in S3
- Uses a DynamoDB table to lock that state, so that two simultaneous state actions don't effect the state at once, which could lead to race conditions and corrupt state.
Whether or not you create the Terraform S3 Backend though ClickOps or Terraform is up to you, it's basically a chicken or egg scenario. But in this article I'll go through the ClickOps route as I believe it's more approachable:
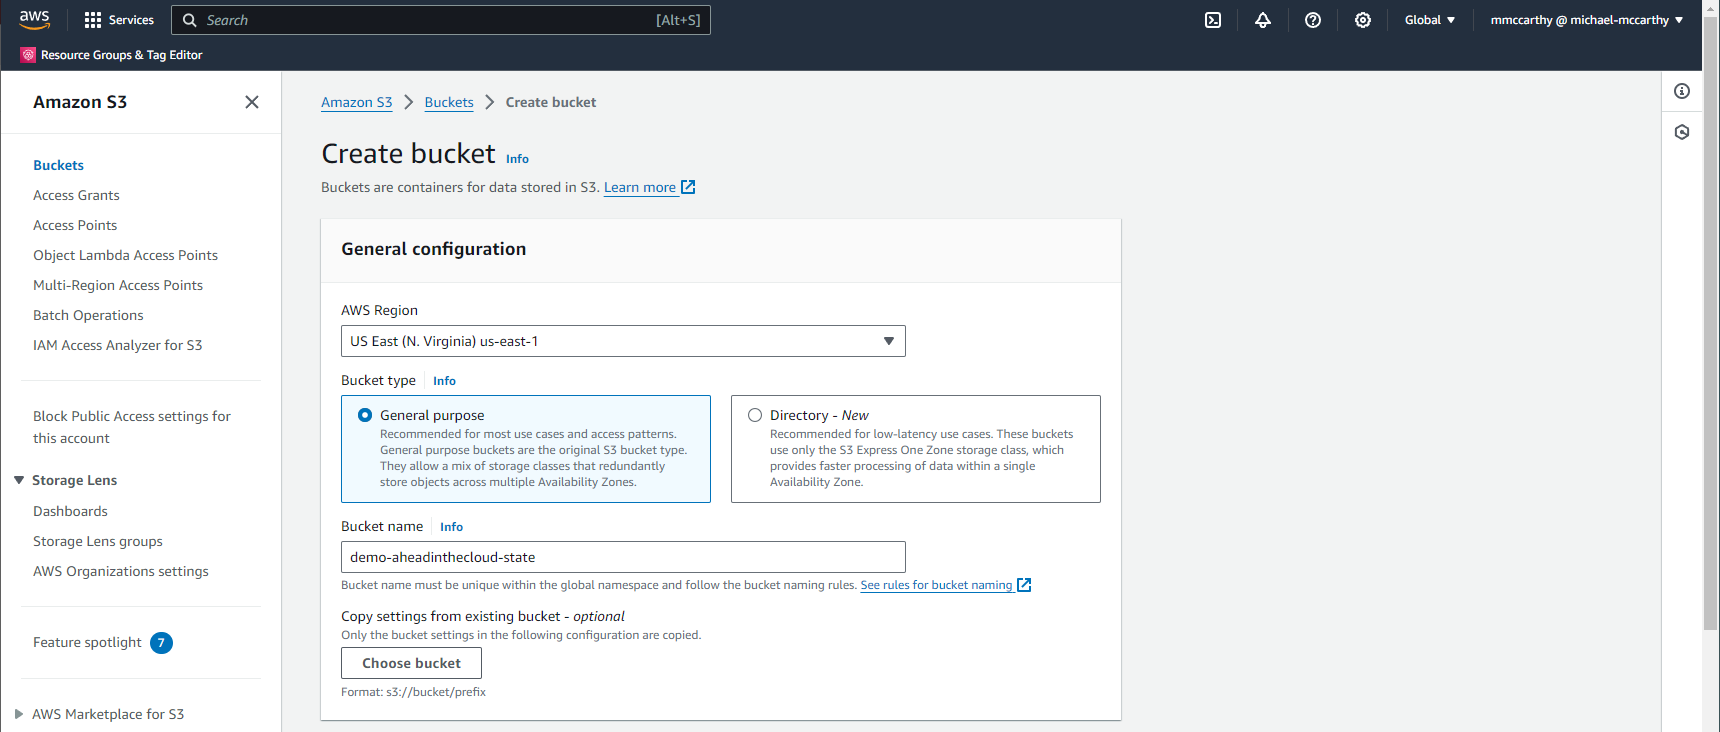
To create the required S3 bucket, navigate to Amazon S3 > Buckets > Create bucket in the console. Under General configuration, enter some globally-unique name, I'll use demo-aheadinthecloud-state. Under Bucket Versioning make sure to set versioning to Enable. Leave everything else as default and click Create bucket. That's it, that's our remote state bucket created!
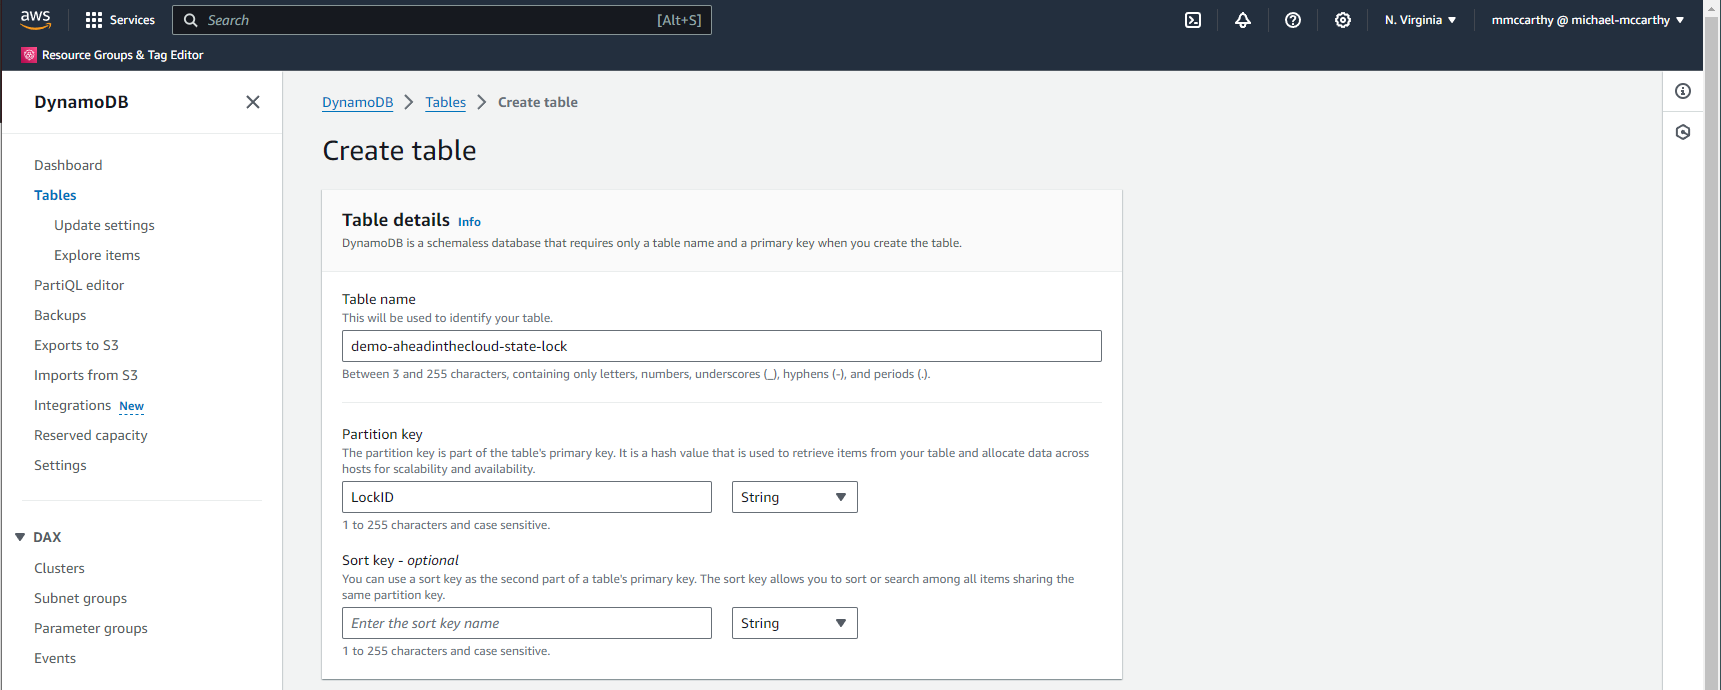
Now we'll create a DynamoDB table for state locking. DynamoDB is AWS's fully managed, serverless, key-value NoSQL database. Because DynamoDB is serverless, we only pay for what we use, and specifically that's only one read and potentially one write request per state action (i.e. plan, apply, destroy). DynamoDB has a generous free tier offer, enough to support 200M requests per month! To setup your DynamoDB table navigate to DynamoDB > Tables > Create table. Under Table details set some name for Table name, I'll use demo-aheadinthecloud-state-lock, and set Partition key to LockID. Leave everything else as default and click Create table. And now we've create our DynamoDB table for state locking as well!
Now before we actually use these new resources for our S3 backend, let's make sure that we can properly authenticate. You'll remember that the IAM policy I'm currently using gives me access to all S3 actions, but now I'll also need to perform actions on DynamoDB as well. To grant the required actions, you'll need to update your IAM policy to something similar to the below, making sure to sub out all instances of demo-aheadinthecloud-state and demo-aheadinthecloud-state-lock for whatever values you used for your S3 bucket name and DynamoDB table respectfully:
{
	"Version": "2012-10-17",
	"Statement": [
		{
			"Sid": "AllowS3",
			"Effect": "Allow",
			"Action": [
			    "s3:ListBucket",
			    "s3:GetObject",
			    "s3:PutObject",
			    "s3:DeleteObject"
			],
			"Resource": [
                "arn:aws:s3:::demo-aheadinthecloud-state",
                "arn:aws:s3:::demo-aheadinthecloud-state/*"
            ]
		},
		{
			"Sid": "AllowDynamoDB",
			"Effect": "Allow",
			"Action": [
			     "dynamodb:DescribeTable",
                 "dynamodb:GetItem",
                 "dynamodb:PutItem",
                 "dynamodb:DeleteItem"
			],
			"Resource": "arn:aws:dynamodb:*:*:table/demo-aheadinthecloud-state-lock"
		},
		{
			"Sid": "AllowUseCase",
			"Effect": "Allow",
			"Action": [
			     "s3:*"
			],
			"Resource": "*"
		}
	]
}
You'll notice a few major changes in the above IAM policy JSON. Majorly, I created two new statements in the policy, AllowS3 and AllowDynamoDB. The AllowS3 gives any IAM user, group, or role it's assigned to permissions to execute the s3:ListBucket, s3:GetObject, s3:PutObject, and s3:DeleteObject API calls against the bucket arn:aws:s3:::demo-aheadinthecloud-state or bucket objects arn:aws:s3:::demo-aheadinthecloud-state/* (note these are separate resources). Similarly, the AllowDynamoDB statement allows required actions against our recently created DynamoDB bucket. AllowUseCase exists just for the API calls required for your unique use case. You can include anything needed in the Actions list, but we only need s3:* for our mini use case of deploying a single S3.
Step 3: Integrating S3 Backend
Finally we can integrate our Terraform project with the S3 backend. This is as simple as adding a new backend block with our S3 backend configuration into the terraform block of our main.tf:
terraform {
  backend "s3" {
    bucket         = "demo-aheadinthecloud-state"
    key            = "terraform-use-case"
    region         = "us-east-1"
    dynamodb_table = "demo-aheadinthecloud-state-lock"
  }
  required_providers {
    aws = {
      version = ">= 5.33.0"
      source  = "hashicorp/aws"
    }
  }
}

resource "aws_s3_bucket" "example" {
  bucket = "terraform-use-case-bucket-2"
}
Here I map values in the backend block to the infrastructure we just created and the project-specific variables:
bucketis the name of the S3 bucket used to store the project statekeyis the key (i.e. path) on S3 used to store the project state (I recommend you use the project name here)regionis the region of the backend infrastructuredynamodb_tableis the name of the DynamoDB table used for state locking
Also note, I updated the value of aws_s3_bucket.example.bucket from terraform-use-case-bucket to terraform-use-case-bucket-2. This is just to make sure an actual change occurs once we apply in the event that we never ran the destroy command.
The final step in our integration of the Terraform S3 backend is by running init once more to validate and configure your new backend before performing any state operations:
terraform init
Initializing the backend...

Successfully configured the backend "s3"! Terraform will automatically
use this backend unless the backend configuration changes.

Initializing provider plugins...
- Reusing previous version of hashicorp/aws from the dependency lock file
- Using previously-installed hashicorp/aws v5.33.0

Terraform has been successfully initialized!

You may now begin working with Terraform. Try running "terraform plan" to see
any changes that are required for your infrastructure. All Terraform commands
should now work.

If you ever set or change modules or backend configuration for Terraform,
rerun this command to reinitialize your working directory. If you forget, other
commands will detect it and remind you to do so if necessary.
Step 4: Apply with S3 Backend
Now when we run apply, we'll be storing our state in our remote state bucket:
terraform apply
Terraform used the selected providers to generate the following execution plan. Resource actions are indicated with the following symbols:
  + create

Terraform will perform the following actions:

  # aws_s3_bucket.example will be created
  + resource "aws_s3_bucket" "example" {
      + acceleration_status         = (known after apply)
      + acl                         = (known after apply)
      + arn                         = (known after apply)
      + bucket                      = "terraform-use-case-bucket-2"
      + bucket_domain_name          = (known after apply)
      + bucket_prefix               = (known after apply)
      + bucket_regional_domain_name = (known after apply)
      + force_destroy               = false
      + hosted_zone_id              = (known after apply)
      + id                          = (known after apply)
      + object_lock_enabled         = (known after apply)
      + policy                      = (known after apply)
      + region                      = (known after apply)
      + request_payer               = (known after apply)
      + tags_all                    = (known after apply)
      + website_domain              = (known after apply)
      + website_endpoint            = (known after apply)
    }

Plan: 1 to add, 0 to change, 0 to destroy.

Do you want to perform these actions?
  Terraform will perform the actions described above.
  Only 'yes' will be accepted to approve.

  Enter a value: yes

aws_s3_bucket.example: Creating...
aws_s3_bucket.example: Creation complete after 1s [id=terraform-use-case-bucket-2]
We can confirm this in the console:
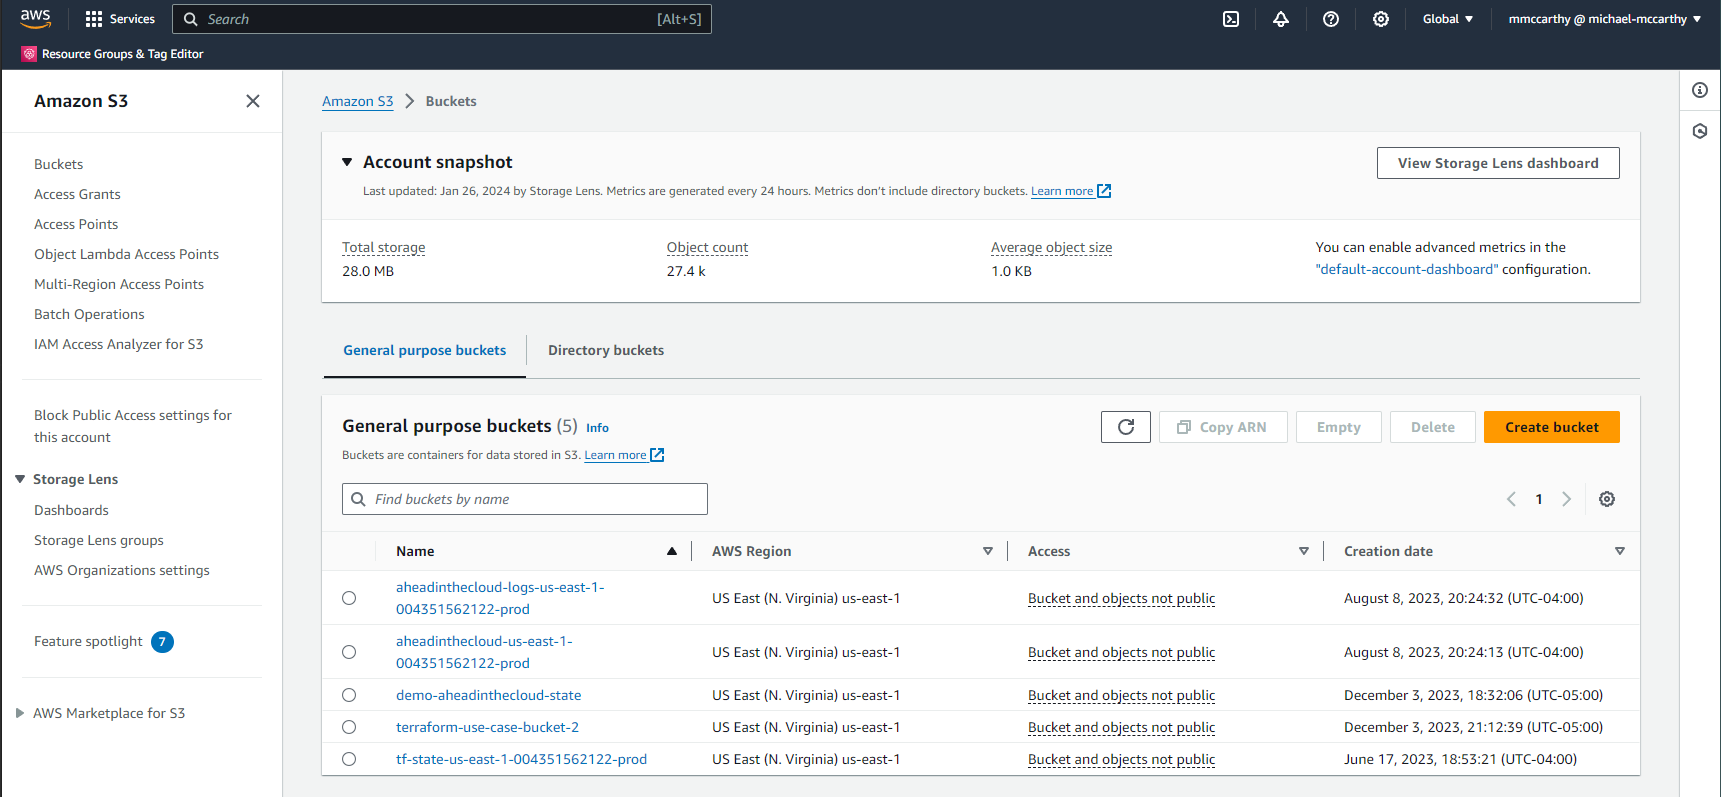
Success! We can see the newly created bucket terraform-use-case-bucket-2 among our buckets. We can also see our remote state bucket, demo-aheadinthecloud-state, let's look inside:

Here we see one key (this is the same value for key we set previously in the main.tf backend block), and the value here is actually our remote state! I can download the file and confirm (remember the state file should be considered sensitive):
{
  "version": 4,
  "terraform_version": "1.5.0",
  "serial": 1,
  "lineage": "c6d7817f-f3a8-bc2b-c843-2828d3b46363",
  "outputs": {},
  "resources": [
    {
      "mode": "managed",
      "type": "aws_s3_bucket",
      "name": "example",
      "provider": "provider[\"registry.terraform.io/hashicorp/aws\"]",
      "instances": [
        {
          "schema_version": 0,
          "attributes": {
            "acceleration_status": "",
            "acl": null,
            "arn": "arn:aws:s3:::terraform-use-case-bucket-2",
            "bucket": "terraform-use-case-bucket-2",
            "bucket_domain_name": "terraform-use-case-bucket-2.s3.amazonaws.com",
            "bucket_prefix": "",
            "bucket_regional_domain_name": "terraform-use-case-bucket-2.s3.us-east-1.amazonaws.com",
            "cors_rule": [],
            "force_destroy": false,
...
I can also checkout the DynamoDB state lock by going to DynamoDB > Explore items > demo-aheadinthecloud-state-lock:
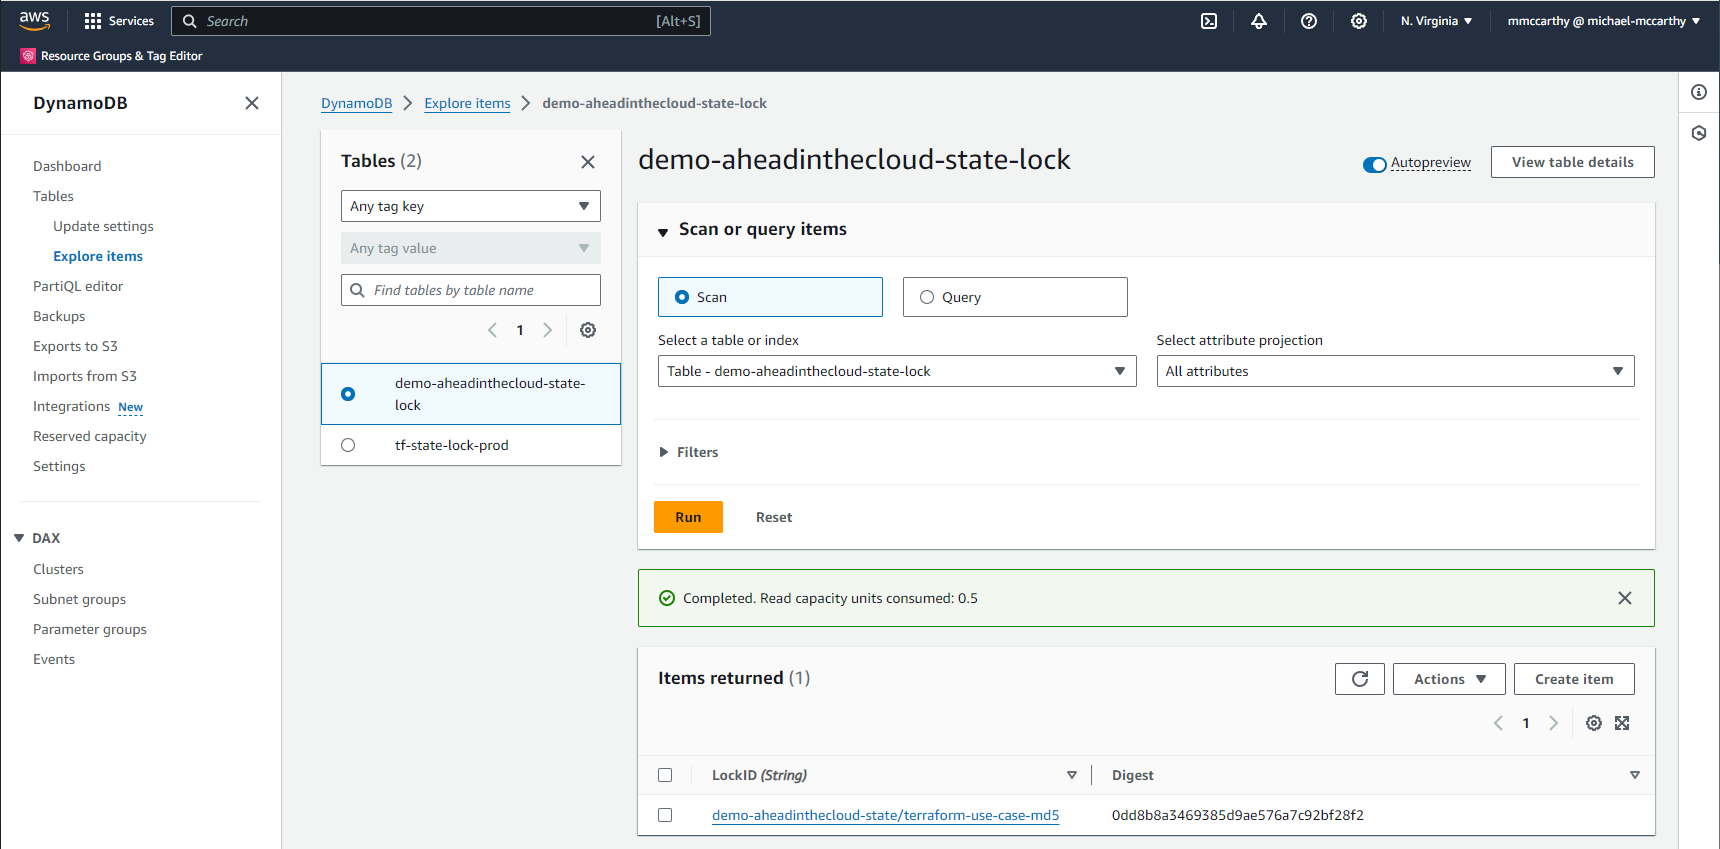
We can see a new item in our DynamoDB table with LockID of demo-aheadinthecloud-state/terraform-use-case-md5. This is effectively the bucket plus key values of the main.tf backend block. The value is the md5 hash of the bucket object (i.e. state).
Conclusion
That's it, we've successfully create a Terraform S3 remote state with state locking and performed a successful deployment. We're authenticating through an IAM User with an IAM Policy configured with least-privilege permissions. Our remote state is secure in AWS with 99.999999999% (11 nines) data durability and encryption at rest. And we've configured state locking with DynamoDB. We've migrated our local state to an S3 remote state and observed what's happening within the remote state infrastructure.
To fully teardown this project you can run terraform destroy directly from your local workspace. However, You'll need to manually delete remote state infrastructure. However, if you plan to work in Terraform long-term I'd recommend you keep these live and share these same resources across all of your Terraform projects. For inspiration you can checkout how I do this for my own Terraform projects; I also manage the remote state infrastructure through Terraform in this repo so you can also see how you'd set this up through IaC instead of manually as we did today. It's highly circular-dependent and interesting to setup!