- Published on
How I Learned to Stop Worrying and Love the NAT Instance
- Authors

- Name
- Michael McCarthy
From a security standpoint, AWS recommends putting all subnets that don't need to be accessed from the internet within a private subnet as best practice. However, most applications don't exist in a box, and even if access from the internet to the instance isn't needed, it's pretty likely that the instance will need to access the internet (e.g. pulling some data, hitting an API, downloading binaries from PYPi, etc.). In these cases a NAT solution is required!
But while following best practice to the letter, you'll see that AWS recommends NAT gateways over NAT instances, citing reliability and performance efficiency. And while the six pillars of the AWS Well-Architected Framework help cloud engineers weigh architectural decisions (operational excellence, security, reliability, performance efficiency, cost optimization, and sustainability), it’s long been an open secret that NAT gateways are one of the classic AWS gotchas, having a total cost of ownership (TCO) of over $30 per month, not even counting data processing fees. And when you're a hobbyist building on your own dime, one pillar stands above the rest in importance, cost optimization...
When you tip the scale towards cost optimization, NAT instances are the clear winner when routing private subnets out to the internet. And while they may be a more manual solution with the potential for greater downtime, for non-production hobbyist use cases, they're easily good enough. Here I'll walk through how you can set up your own NAT instance using Andrew Guenther's free and open-source fck-nat AMIs deployed on a t4g.nano, with a rough TCO of a bit over $3 per month!
Prerequisites
A few things you should have before starting this solution:
- AWS CLI and console access to an AWS account with permissions to create EC2 and VPC resources
- An existing VPC in said AWS account with at least one public and one private subnet
Solution Overview
In short, we'll deploy the fck-nat AMI in an Auto Scaling group (ASG) of one, giving us a NAT instance with rudimentary disaster recovery at a fraction of the cost of a gateway! The launch template used in the ASG leverages a shared ENI for consistent routing and failover during disaster recovery.
Step 1: Create Security Group
To start things off we'll create a security group, which will control ingress and egress traffic for our NAT instance. It's a pretty simple step, but needs to be done beforehand so that it can be attached to appropriate steps.
In the AWS console go to EC2 > Security Groups > Create security group and fill in details like shown below.
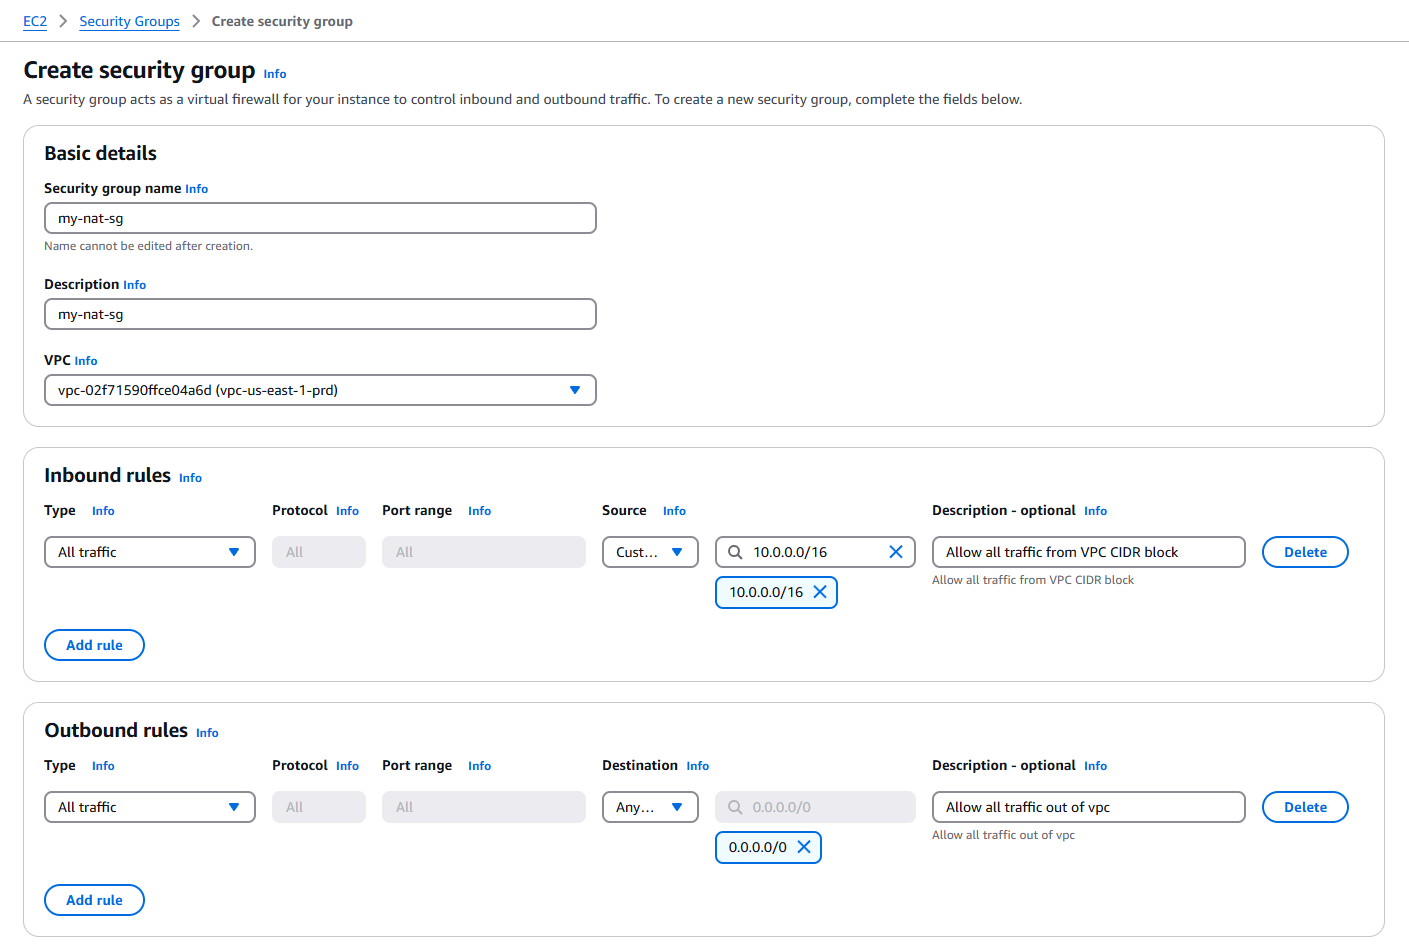
Here I allow all ingress traffic from my VPC, with the primary CIDR 10.0.0.0/16. Make sure that you customize this with your own CIDR range. The egress traffic is allowed out to any destination. These two rules together would allow any instance in my VPC to reach anything on the internet through the NAT instance! Click Create security group to finish this step of the solution.
Step 2: Create Elastic Network Interface
Since this is a networking project, let's start things off by creating an elastic network interface (ENI)! An ENI is a logical representation of a networking card in a VPC, ENI's can be associated to public/private IP addresses, and can be directly associated to EC2s. In a way, ENIs let you decouple EC2s from network routing, and will allow automatic failover if our NAT instance needs to be recreated by the ASG due to a failed health check.
Create your own ENI at EC2 > Network interfaces > Create network interface in the AWS console.
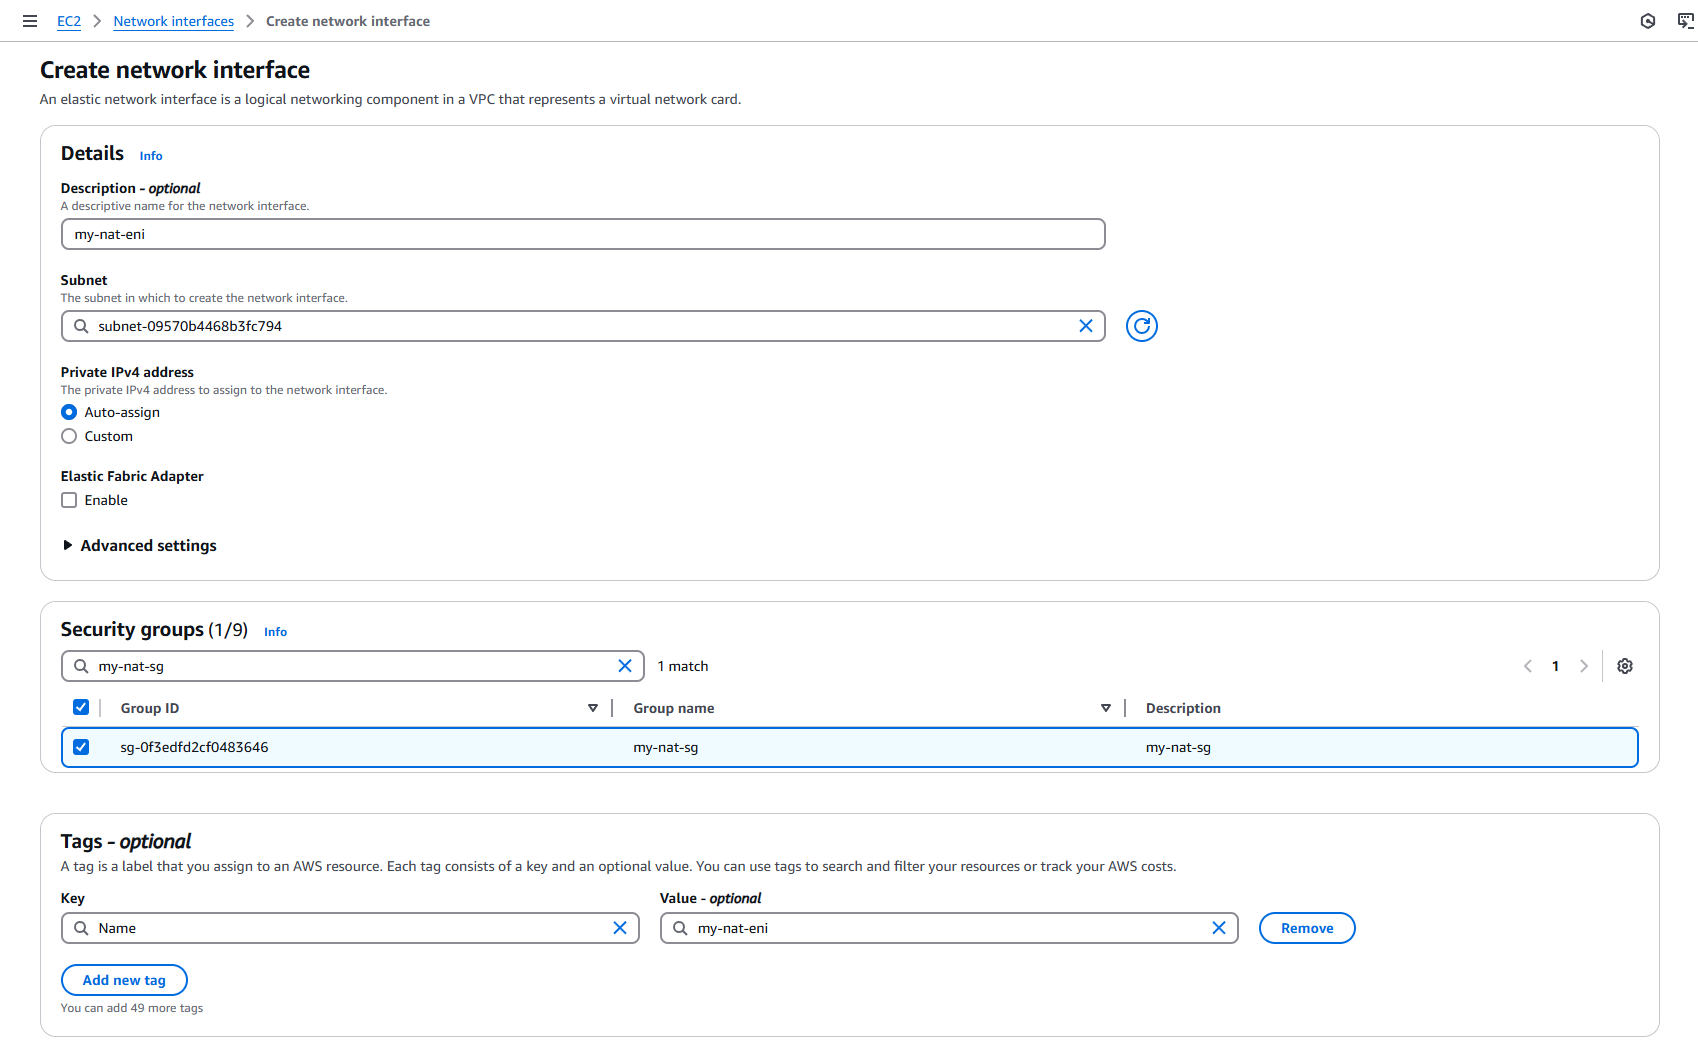
Important to note, for Subnet, you need to specify a public subnet (i.e. a subnet with a route to an internet gateway). Also important, for Security groups, make sure that you select the security group you created in the previous Step 1. Click Create network interface to to create the ENI!
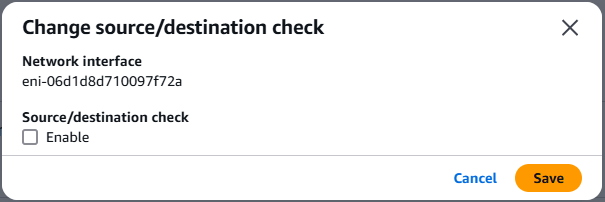
There's actually one more step required to finish the ENI. Once created, check the new ENI in EC2 > Network interfaces and click Actions > Change source/dest. check. In the pop-up make sure to uncheck Source/destination check. The default source/destination check ensures that the ENI is either the source or destination of any traffic sent or received; since a NAT instance will send and receive traffic when the source or destination isn't itself, we need to disable this check for the NAT instance to work correctly.
Step 3: Update Private Subnet Route Table(s)
Now in AWS, the route tables are the rules that dictate how traffic is routed within your subnets. Subnets are associated to route tables in a many-to-one; a single route table can be associated to multiple subnets, but a single subnet is always associated to a single route table. While route tables can have multiple routes, traffic is generally routed using the most specific route that matches the traffic (e.g. 10.10.2.15/32 has priority over 10.10.2.0/24).
I already mentioned that while our NAT instance will be deployed into an ASG for some rudimentary disaster recovery, the static ENI that we just created will give us some consistency and automatic failover, as NAT instances are destroyed and recreated. So what we'll do now is create routes to this ENI directly.
For this solution to work, you'll want to replicate this step for each route table of each private subnet you want to route through the NAT instance, the only requirement here is that all subnets share the same VPC.
Go to VPC > Route tables > <route table ID> > Edit routes, and Add route. For Destination enter 0.0.0.0/0 which represents all outgoing traffic not matching a more specific route. For Target, select Network Interface from the dropdown, and then select the previously created ENI. Click Save changes.
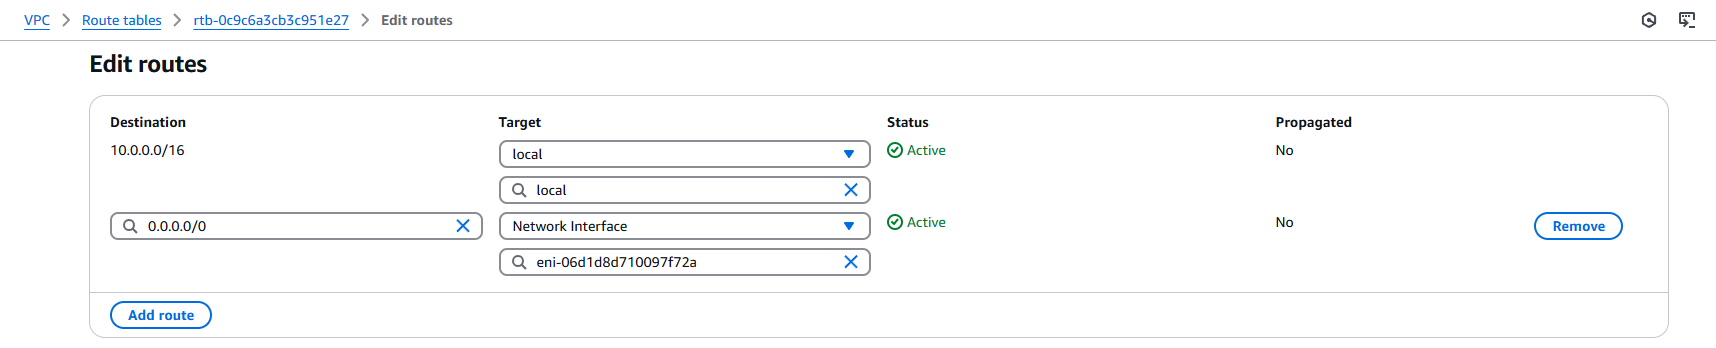
If you go back now you'll see your new route displayed at the top of your route table, however, under Status you'll note that it's indicated as Blackhole! This is expected and just means that the NAT instance isn't online yet, we'll fix this in the last few steps.

Step 4: Create Launch Template
Before we create our NAT instance in our future ASG, we need to specify the EC2 configuration required for the NAT instance as a launch template. This is where we specify and tie together instance details for our AMI ID, instance type, and ENI.
AWS's self-owned NAT AMI reached end of maintenance support on December 31, 2023, and AWS officially recommends NAT gateways compared to NAT instances for most use cases. But like I already mentioned, NAT gateways are expensive and potentially cost prohibitive to hobbyists, so we'll note the tradeoffs and go forward creating our NAT instance launch template.
AWS does have a whitepaper breaking down how you can create your own NAT AMI, however again, for simplicity and ease of maintainability, we'll be using Andrew Guenther's free and open-source fck-nat.
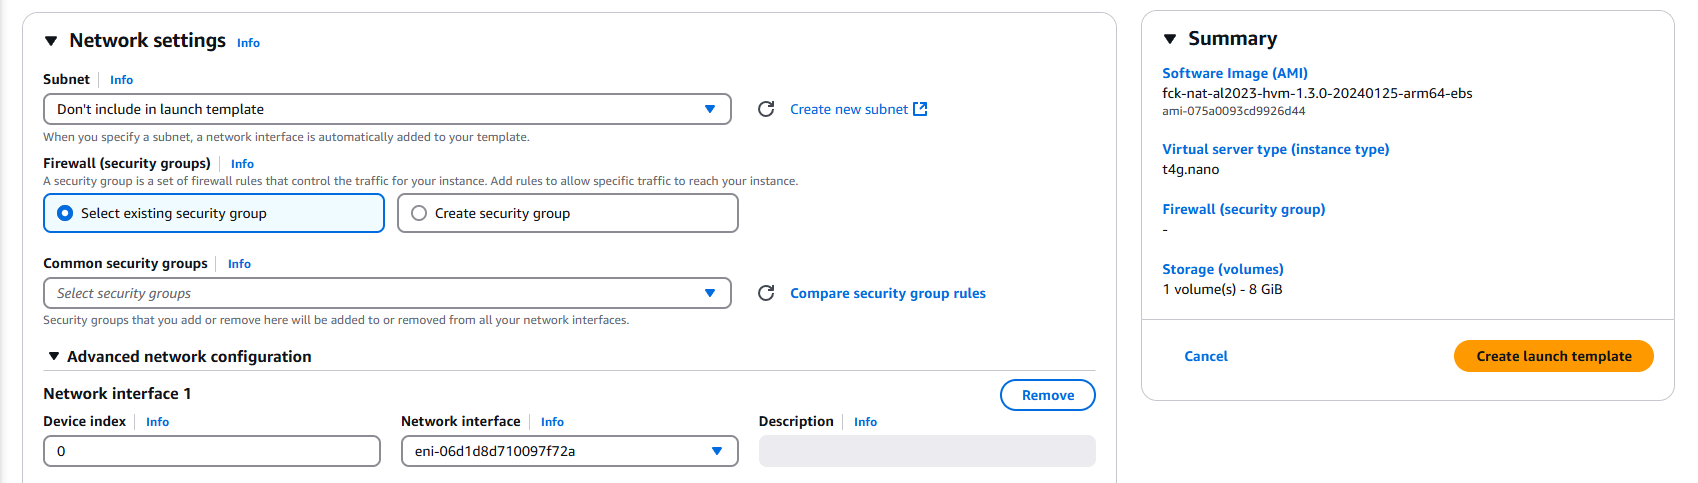
Create a new launch template at EC2 > Launch templates > Create launch template. For Application and OS Images (Amazon Machine Image) search for 568608671756 (fck-nat AMI account ID), and select the Community AMIs tab. Select either an arm64 or x86_64 image with a name beginning with 'fck-nat-al2023-' signifying it's been built on Amazon Linux 2023 (I chose fck-nat-al2023-hvm-1.3.0-20240125-arm64-ebs here).
For Instance type select t4g.nano (currently priced at only $0.0042 USD per hour). This is fine for this demo, and for many common use cases, if you do find that you have network heavy use cases that are bottlenecking on the NAT, vertically scaling the instance type will increase network bandwidth.
Finally in Network settings > Advanced network configuration, click Add network interface and select our ENI under Network interface. Everything else can be left as default, and click Create launch template!
Step 5: Create Auto Scaling Group
Finally we'll bring everything together, creating an ASG which will create and manage our NAT instance for us! Unfortunately, AWS currently does not allow us to specify a launch template specifying an ENI ID through the console, so this is the only step of the process requiring the AWS CLI...
If you don't have AWS CLI already set up locally, I walkthrough the setup in a previous blog post here (Steps 1 - 3).
Once you have AWS CLI set up (with required permissions for autoscaling), you'll want to run something similar to the following:
aws autoscaling create-auto-scaling-group \
    --auto-scaling-group-name my-nat-asg-3 \
    --launch-template LaunchTemplateId=lt-0a1ab202af8a348be,Version='$Latest' \
    --min-size 1 \
    --max-size 1 \
    --availability-zones us-east-1a \
    --tags 'ResourceType=auto-scaling-group,ResourceId=my-nat-asg-3,Key=Name,Value=my-nat,PropagateAtLaunch=true'
Importantly, you want to substitute the LaunchTemplateId value with whatever the launch template ID is for the launch template you created previously. Also important, you're required to set the availability-zones value to the same availability zone as your ENI; this solution is inherently a single-AZ solution, and a multi-AZ solution requires multiple ENIs and NAT instances.
Optionally, you can also specify a value for tags here if you want the NAT instances managed by this ASG to be named. Just make sure that you match auto-scaling-group-name to tags.ResourceId and then whatever value you specify for tags.Value will be used to name your Nat instance.
But that's it, we're done!
If you did everything right, you should be able to see the new instance in the EC2 console.

Also, looking back at the route table we updated previously, we can see the Status of our added route was changed from Blackhole to Active!

As a final real world test, I'll launch a new instance into my private subnet. Once the instance is launched, I'll connect using Session Manager (hopefully I'll cover this in a future blog post...).
From inside the instance (in a private subnet) I'll check connectivity to the internet by pinging this site, aheadinthecloud.com.
sh-5.2$ ping aheadinthecloud.com
PING aheadinthecloud.com (13.32.151.46) 56(84) bytes of data.
64 bytes from server-13-32-151-46.iad66.r.cloudfront.net (13.32.151.46): icmp_seq=1 ttl=243 time=1.53 ms
64 bytes from server-13-32-151-46.iad66.r.cloudfront.net (13.32.151.46): icmp_seq=2 ttl=243 time=1.54 ms
64 bytes from server-13-32-151-46.iad66.r.cloudfront.net (13.32.151.46): icmp_seq=3 ttl=243 time=1.53 ms
64 bytes from server-13-32-151-46.iad66.r.cloudfront.net (13.32.151.46): icmp_seq=4 ttl=243 time=1.53 ms
64 bytes from server-13-32-151-46.iad66.r.cloudfront.net (13.32.151.46): icmp_seq=5 ttl=243 time=1.57 ms
^C
--- aheadinthecloud.com ping statistics ---
5 packets transmitted, 5 received, 0% packet loss, time 4008ms
rtt min/avg/max/mdev = 1.529/1.539/1.565/0.013 ms
Perfect! You can see in the above that 100% of my packets were returned, proving connectivity to the internet!
Conclusion
And in just five simple steps, you've set yourself up with a NAT solution, while saving over 90% compared to a NAT gateway! Admittedly, a NAT gateway is always the better solution for production use cases, with features such as multi-AZ high availability and manual patching and maintenance; but as I've repeatedly stressed throughout this post, there's always the exception to the rule, and the cost savings of this solution is a major plus that can't be ignored!
If you want to productionize the above solution a bit more, there's an official CDK module and official Terraform module available, and I have my personal Terraform module made public as well (I created mine before the official Terraform module came out, so they do differ slightly).
There's also a lot of avenues available to drive cost-savings up even more from what I presented today. If you incorporate Spot Instances, you can save up to an additional 90%. Furthermore, if you play around with schedule scaling for the ASG, you can have the NAT instances running only when you need them (e.g. only during the day), and benefit from additional savings!